
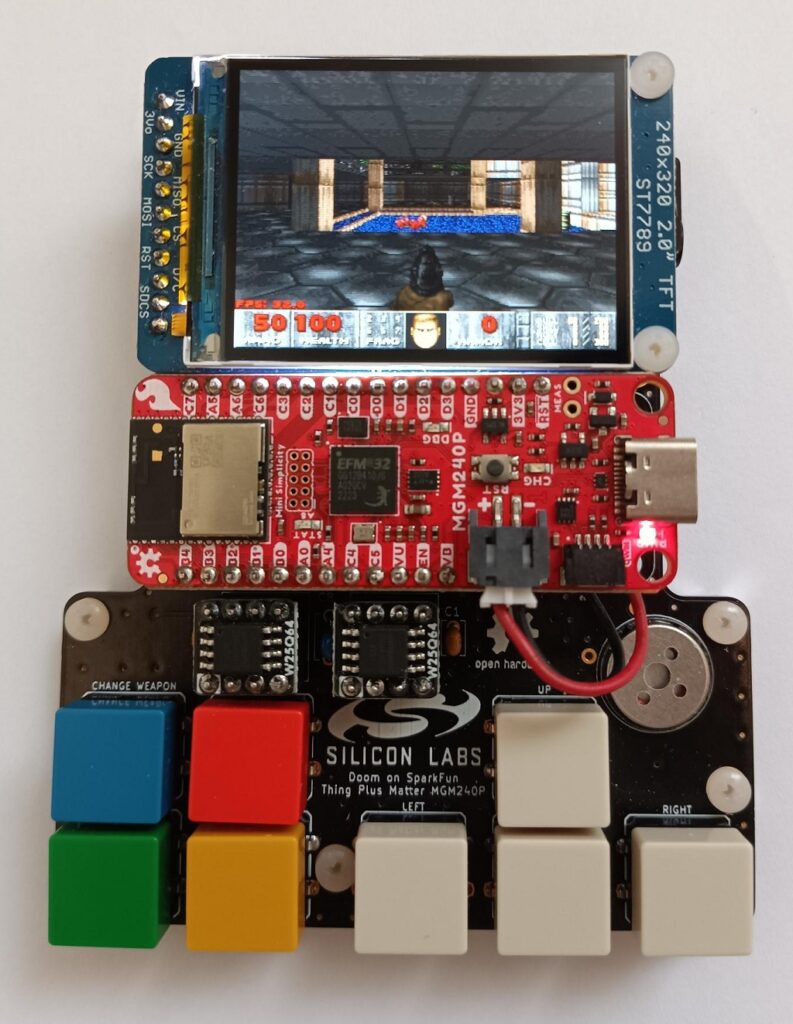
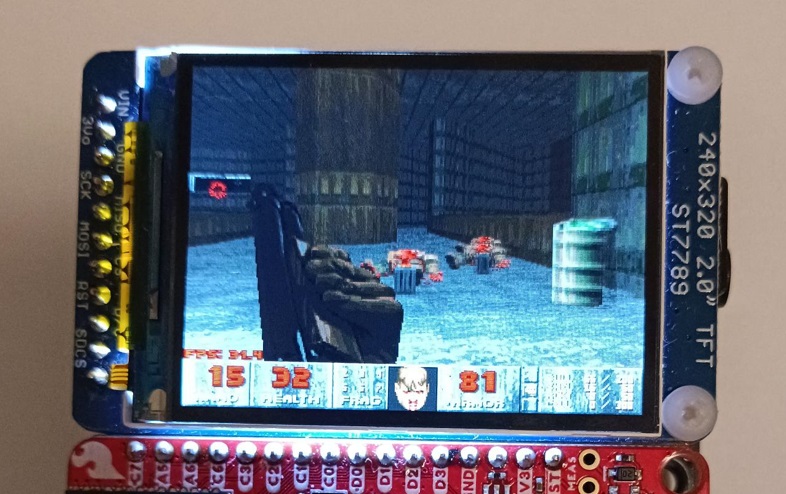
12/03/2024 Update! We have implemented a dynamic partial screen update algorithm so that the peak frame rate is 35 fps even with the full 320 x 240 resolution!
Also we have fixed an issue that prevented sounds coming from doors/lifts from being played.
Introduction – Happy days are here again!
After we released our last Doom port, about 2 years ago, we realized that a lot of more RAM optimization was possible. Therefore, just out of curiosity to see how far we could get, in late 2021 we worked on squeezing the RAM usage. We thought that the result of such exercise would have been useful, if we later wanted to port Doom to a device with less RAM, or if we wanted to restore the original resolution, and add other missing features such as music.
In few months of sporadic work, we were able to save many tens of kilobytes, both in terms of static and dynamically allocated memory, and we were able to run the same port using much less memory, at the same 240 x 240 pixels resolution.
Later, in March 2022, Kilograham published his Doom port to RP2040, and from there, we found and used one last clever optimization trick, that was missing in our work: this saved few more kilobytes (look for “validcount” discussion below for more details).
The project was not developed any further for several months, until we later had in our hands some new interesting devices to port Doom to.
We are talking about the EFR32xG24 RF microcontroller series, that are expected to be the hearth of many new IoT devices using different protocols, such as Matter, BLE, Zigbee, thread, or even proprietary ones, using its built-in 2.4-GHz radio subsystem.
These chips feature an 80 MHz Cortex M33, with 1.5 MB flash, and 256kB RAM.
But can it run Doom? A new Challenge!
A spontaneous question would be: can these chip run Doom? Well, we have already shown that Doom can run flawlessly with a 64 MHz Cortex M4 and 256 kB of RAM, with a 240×240 resolution (90% of Doom original one, which is 320×200), therefore, by looking at the new specs, the answer is: yes, for sure.
However, beside the 10% smaller resolution with respect to the original Doom, our previous port had some other limitations:
- There was no music.
- Audio output was mono channel (8 software channels are mixed to a single mono output).
- There was no multiplayer support.
Since we have now a more powerful device (an 80-MHz Cortex M33 has 1.5 the DMIPS of a 64-MHz Cortex M4), more flash and the same RAM amount, achieving the same result as before would not represent any accomplishment worthy of note.
To account for the increased speed and flash size, we wanted to address all the aforementioned issues, so these were the new challenges this time:
- Running Doom at 35 fps on 320×200 resolution, and at 30fps or better with 320×240 resolution. Noticeably, 320×240 represents a + 20% increase with respect to the original Doom resolution, and, in this case, with a 40-MHz SPI frequency, the maximum achievable frame rate is limited to 32.6 fps. On the other hand, it is worth to remind that 35 fps is the maximum hardcoded limit value in the original Doom. In terms of 3D pixels (i.e. pixels belonging to the 3D scene, excluding the 32-pixel tall status bar), the 320×240 resolution corresponds to a 320×208 large 3D rendered area. Conversely, the 320×200 resolution has a 3D-rendered area of 320×168 pixels. This means that in terms of 3D pixels, a 320×240 resolution corresponds to a 25% increase with respect to the original one.
- Bluetooth low energy (BLE) based multiplayer, with up to 4 players as in original Doom.
Using a wired or custom wireless protocol instead of BLE would be much simpler, but that would not pose any major challenge. To increase this goal’s difficulty, the frame rate at 320×240 during a multiplayer match shall be around 25-30 fps in normal conditions. - OPL2 Music. The majority of 1993-era PCs had OPL2-compatible cards, so this is the target of this project for music output. Probably one of the hardest ones, and at least as hard as the previous goal. To further increase complexity, enabling music should not impact too much the game performance, which shall continue running at 35 or 30 fps as written before.
- Audio shall be stereo, with left/right channel matching sound direction toward the player. Although this goal is rather simple, it still impacts on memory usage.
The other constraints remain unchanged, with respect to our previous projects:
- The full Doom game shall run without limitations on levels, or number of enemies/objects per map.
- No changes to Doom’s graphics engine, texture/sprites quality, game engine (e.g. sound propagation, enemy AI, etc) are allowed.
- Sound effects should be with original sample rate and depth (11025 Hz, 8 bits per sample), except for 22050 Hz samples, which can be downsampled to 11025 Hz. Noticeably, in the original Doom, there is only one 22050 Hz sample, which is present only in multiplayer: item respawn sound effect.
- No external devices, which can offload the MCU workload, can be used.
This is instead the list of what it is allowed:
- Music output can be at 11025 sps, where the original Yamaha OPL2 produces audio at 49716 sps. Noticeably, on one hand this relaxation saves a lot in terms of RAM and/or CPU power, on the other, some more interpolation is required to achieve a similar output especially on the OPL2 operator feedback functionality. Still, due to hardware post filtering, and because of limited audio hardware on 1993, the decrease in quality, even if appreciable, is not tremendous with respect to 1993 standards.
- Any amount of external SPI flash memory can be used to store the Doom WAD file (i.e. where graphics, sound, and level data are stored).
- Original WAD files can be processed by a command-line utility prior to be uploaded to external SPI flash, to optimize either RAM usage or CPU computing power. This is allowed, provided that no graphics/sound/map details are lost in this optimization, e.g. no change in texture resolution is allowed.
- Any kind of keyboard or gamepad can be used. If required, external chips such as a shift-register or port expander can be used.
An additional Challenge
There was still something missing: creating an easy-to-build small handheld console that ran Doom. We wanted to create something that even beginners can replicate, therefore we had to exclude SMD parts.
Luckily, in the meantime, Sparkfun has released a development board with a feather form factor using the MGM240P module: the Sparkfun Thing Plus Matter MGM240P board. This radio module is based on the EFR32MG24, so it is 100% compatible. All the other components had to be either pin-through hole, or available as breakout boards (e.g. the flash memory). The Sparkfun Thing Plus Matter board has support for Li-Ion battery as well, with integrated USB charger, allowing to create a battery-operated device with no effort.
Project timeline

Thanks to Github, it is easy to keep track of the work, and the 2-year timespan of the project does not actually represent the real effort. Indeed, work on the code have been done sporadically, in our free time (read: weekends and holidays), and sometimes, months have passed without any development. For instance, as mentioned at the beginning of this article, the bulk of memory optimization started in late 2021, concluded in late March 2022, and then no time was dedicated to the project, until we got some devices to work with, in July the same year, when the first prototype, still using the 240×240 display, was created.
It took some days to develop, test, and optimize the external dual-flash memory driver. In few more days of coding, we were able to bring Doom to our first prototype, by the end of July, albeit still with the 240×240 resolution.
In the meantime we designed the second prototype with the 320 x 240 display, and thank to the hard optimizing work done before, supporting the bigger resolutions (320 x 200 and 320 x 240) did not take too much effort, just a matter of creating/adjusting some new constant tabulated values, and modifying the data structures, e.g., to hold a number as big as 320 instead of 240.
Music and Multiplayer were still missing.
Working on the music started on mid October 2022 and this was a hard task, as it took 7 weekends to get to the final version. The first multiplayer game, albeit slow and very buggy, was ready for March 2023, although very few time was dedicated to it. The work continued now and then on September, to include all the multiplayer features such as deathmatch, item respawn, time and kills limits, etc.
The design of the handheld console was made at the end of August 2023, and took just a couple of days. Since then, only some modifications were done to improve multiplayer or add minor features:
- Full multiplayer support with cooperative/deathmatch options in menu.
- Main screen becomes darker when opening the menu, which would be otherwise less visible as they are red as the main page.
- Player kills messages. Useless, but still nice to have.
- User-name selection (used for server/client).
The hardware
From the hardware viewpoint, the project is very simple.
This is the block diagram of the hardware.
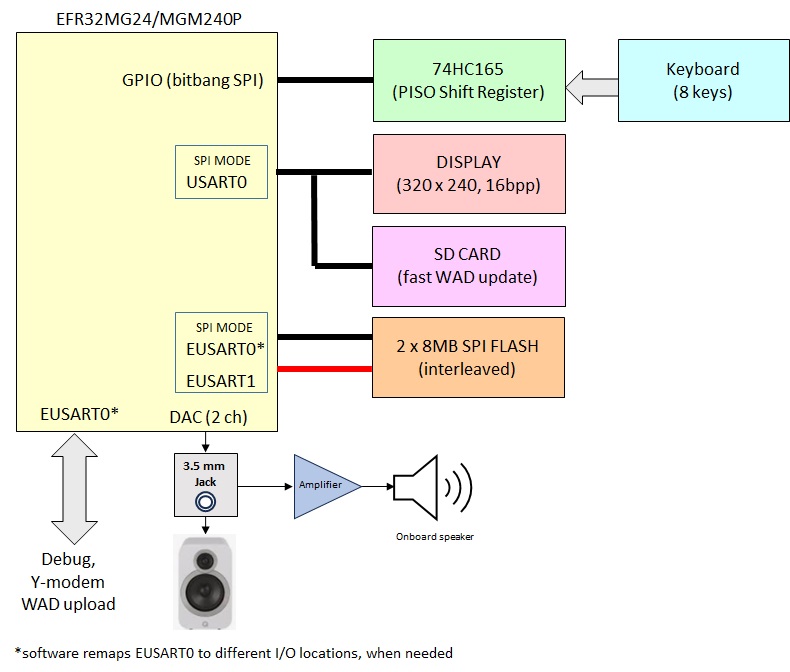
Noticeably, in the same block diagram we are not showing any external circuitry provided by the development board such as power management ICs, the debugger, etc., as they play no role in the project (beside powering up, performing USB to UART bridge and programming the SoC).
- The EFR32MG24/MGM240P is the hearth of this project, and handles everything needed by the application.
- Two external 8-MB SPI memories are connected to two EUSARTs in SPI Mode. These are clocked at 40 MHz.
- The screen is a 320×240 IPS display, and it is connected to the USART of the SoC in SPI mode. The display is mounted on a board, which is produced by Adafruit. The same board also contain a micro SD card reader.
- The aforementioned SD card is connected to the same USART, and it is used to upload the game data file (WAD) to the external SPI memories. One might wonder why the WAD file must be uploaded to the SPI memories, even when the SD card is present. This is because accessing the data from the SPI memories is much faster than accessing from the SD card, where filesystem and SD communication protocol overheads have a very big impact on small payloads.
- A parallel-input-serial-output (PISO) shift register is used to read the 8 gamepad pushbuttons. Its serial interface is connected to some GPIOs. These are bit-banged to create an SPI-like interface. Noticeably this readout is inefficient, but it happens only for a very short time (few microseconds), every frame, so the impact is minimal.
- Two channels of one of the two internal DACs are used to generate the audio analog signal. This is fed to a 3.5 mm Jack connector, to connect a pair of external amplified audio speakers. Headphone can be connected as well, albeit the sound output will be quite low. When no jack is inserted, the two left/right signals are mixed, amplified, and fed to the small onboard speaker.
- One of the two EUSARTs connected to the SPI are also used for debugging printout or YMODEM WAD upload (in case the SD card is not available). When such features are required, the EUSART is configured in UART mode, and remapped to two different GPIOs.
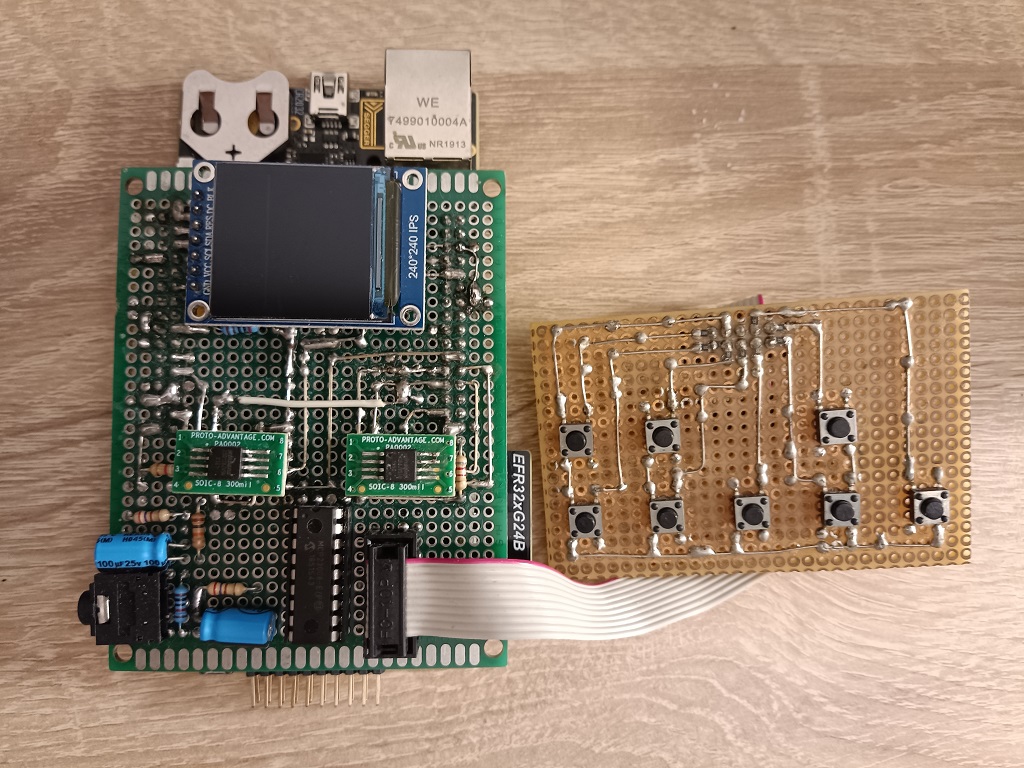
In creating the final version, we stepped through different iterations:
- Breakout board to be mounted on a WSTK, with an EFR32MG24 radio board. This was the first step, where we just ported the existing code base. Noticeably, the board still supported the old 240×240 display. Also, the board did not have a PISO shift register for the keyboard but an I2C port expander (MCP23008). The reason is quite simple: not only we had it already in stock, but also it can configure the inputs with pull ups, so we don’t have to put 8 external resistors.
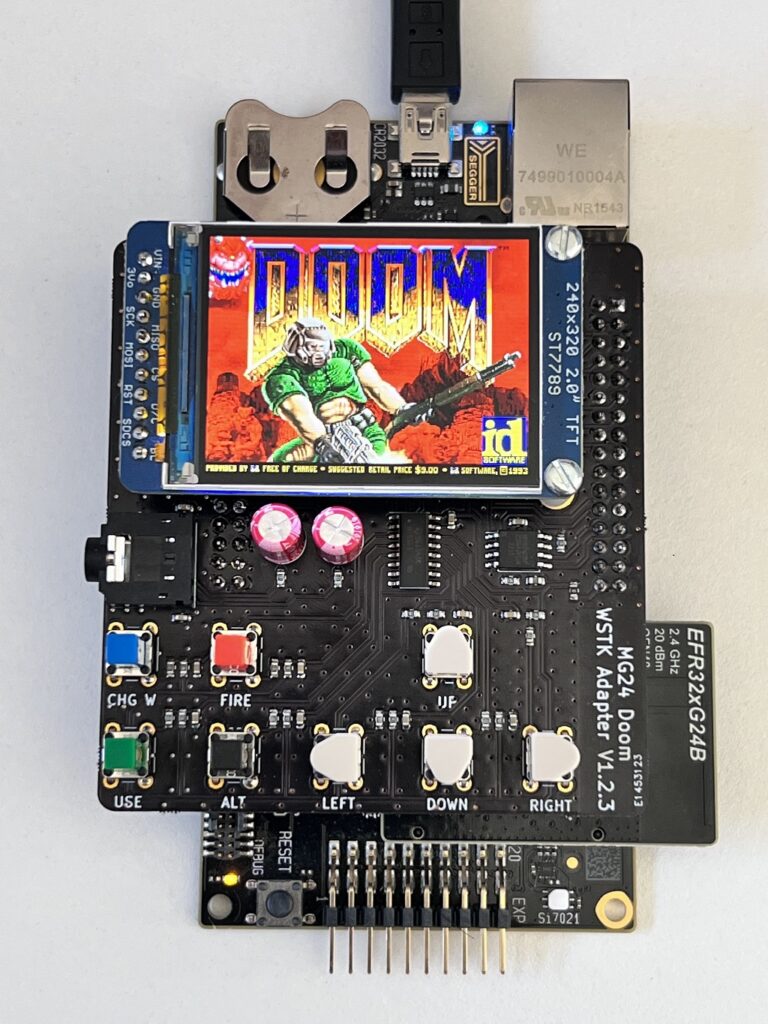
- Daughtercard to be plugged into the WSTK. This natively supports the new display (320×240), and the full project, and can be used if a WSTK + EFR32MG24 radio board is available.
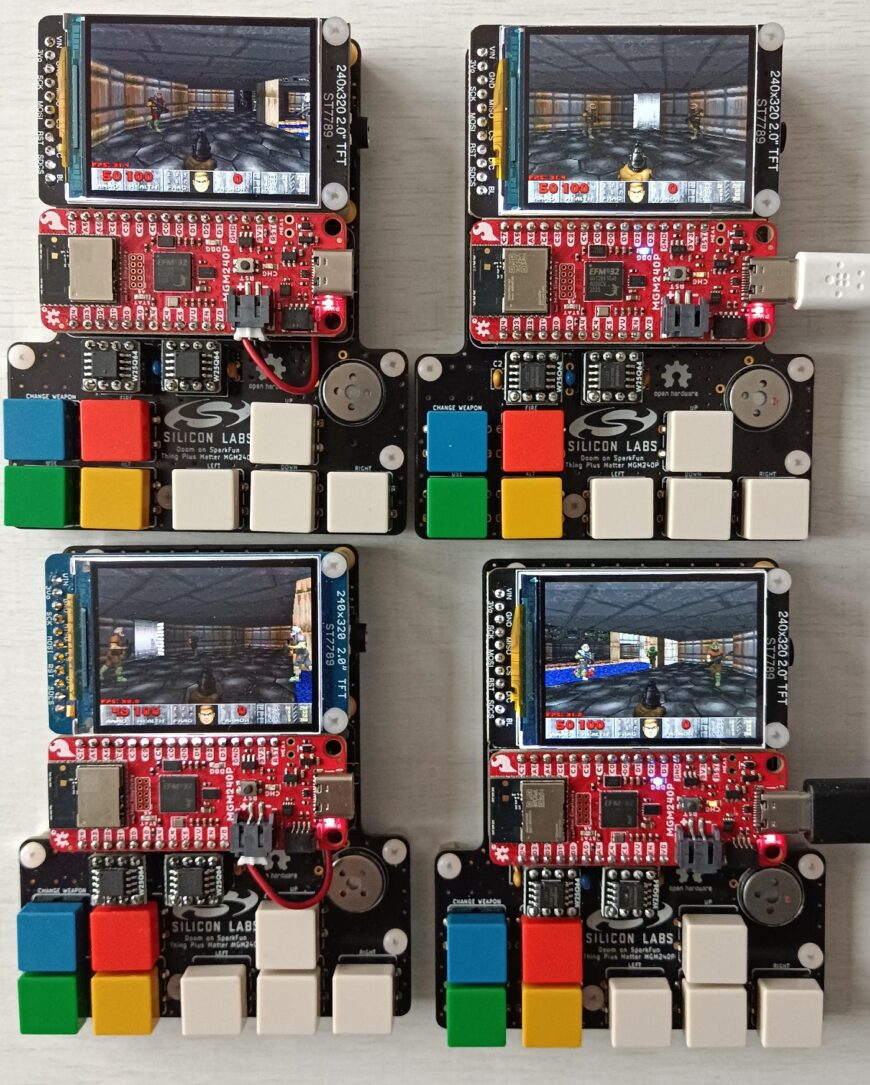
- A small handheld console using the Sparkfun Thing Plus Matter MGM240P board. This includes the previously mentioned internal speaker. It was designed to use only pin-through hole devices, so that even beginners can solder them.
In this article we mainly focus on the third implementation.
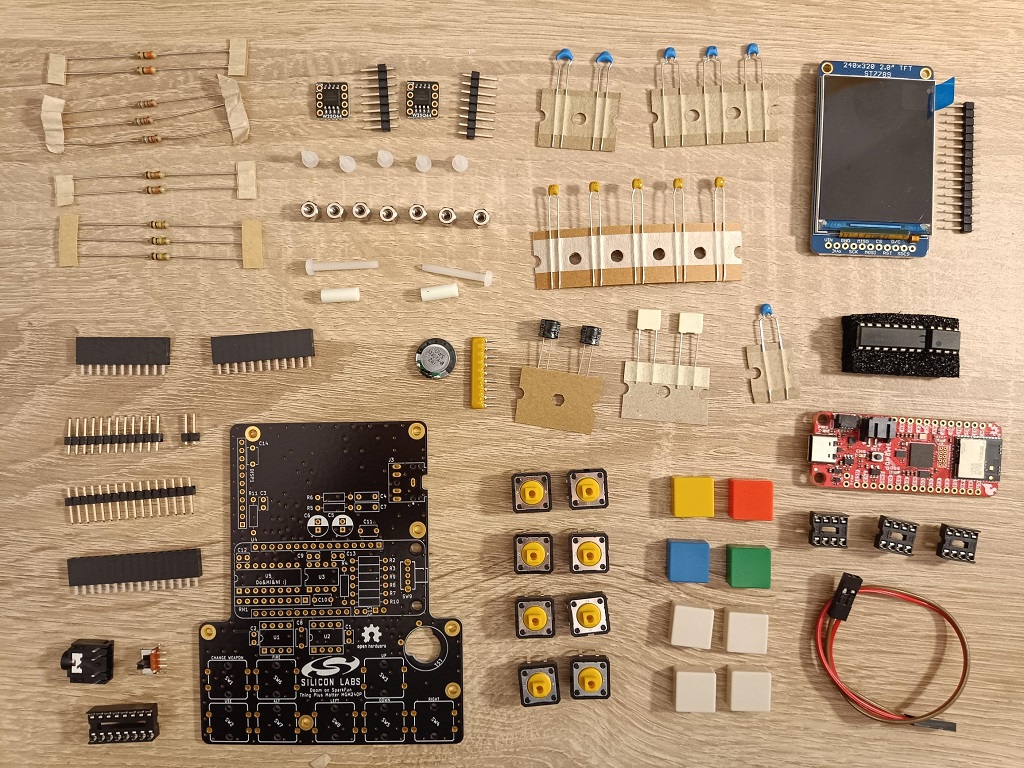
The following picture shows all the components required to mount the project.
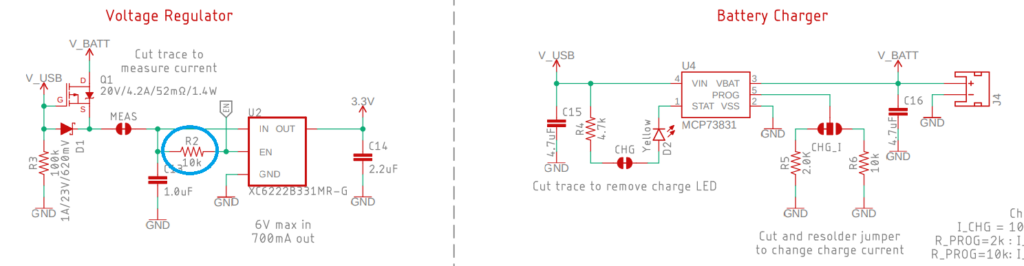
This is the full schematics.
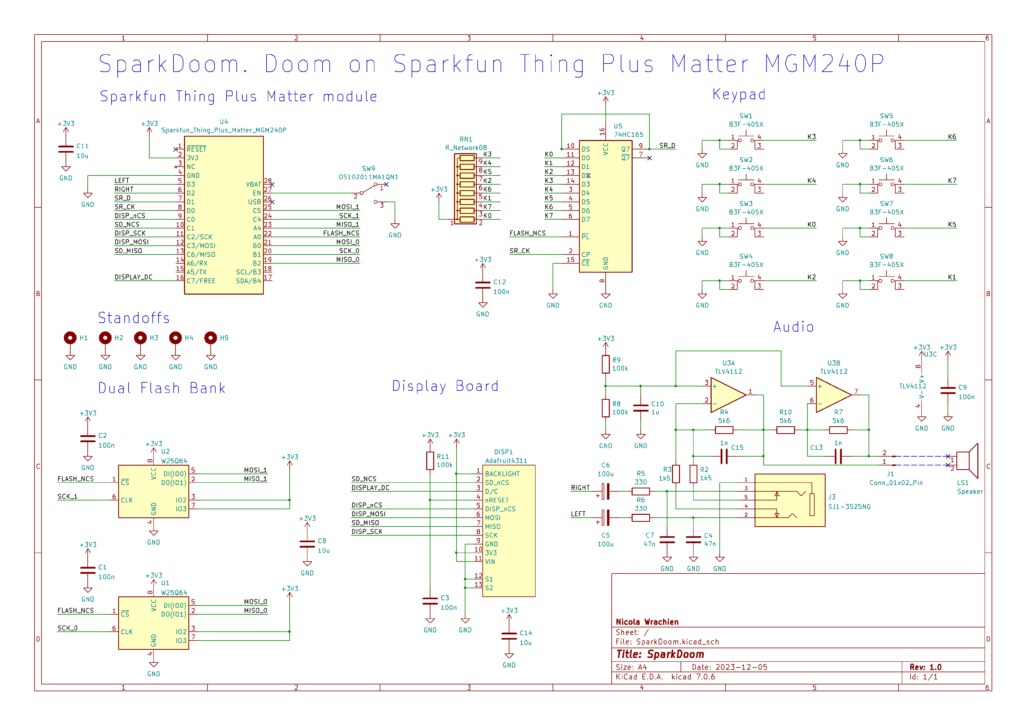
The project is open source, so the open source KiCAD was used to design the boards. You can find all the sources in the MG24_Doom_BLE project repository.
Building Instructions
Hardware
The full KiCAD design files (schematics, BOM, and PCB layout) can be found in the “hardware” subdirectory of the MG24_Doom_BLE project repository.
This project uses commercially available parts from Sparkfun, Adafruit and some mixed general-purpose components available everywhere (Digikey, Mouser, etc., or even your local electronic components shop).
You can have the boards manufactured for few bucks from your favorite PCB manufacturer, using the design files, and we encourage you to modify them to suit your needs. Note: as always, next-hack is not selling such boards: it is a DIY project.
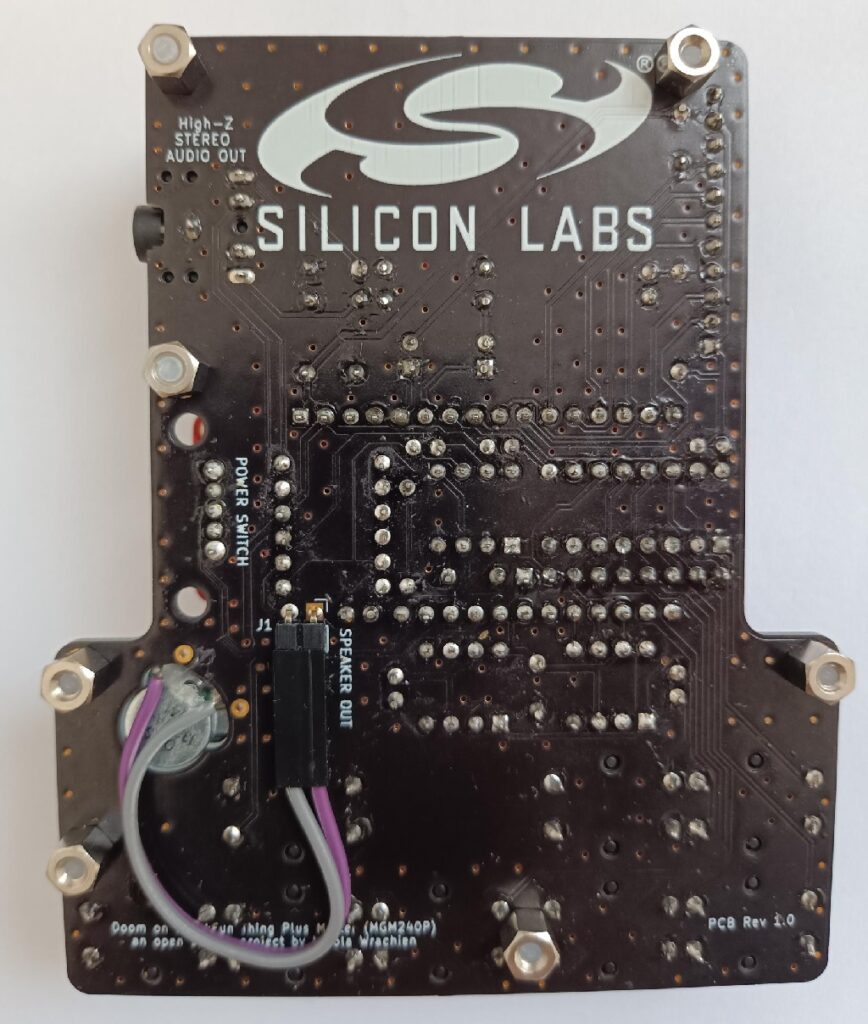
This is the soldered board, without the display and the Sparkfun board.
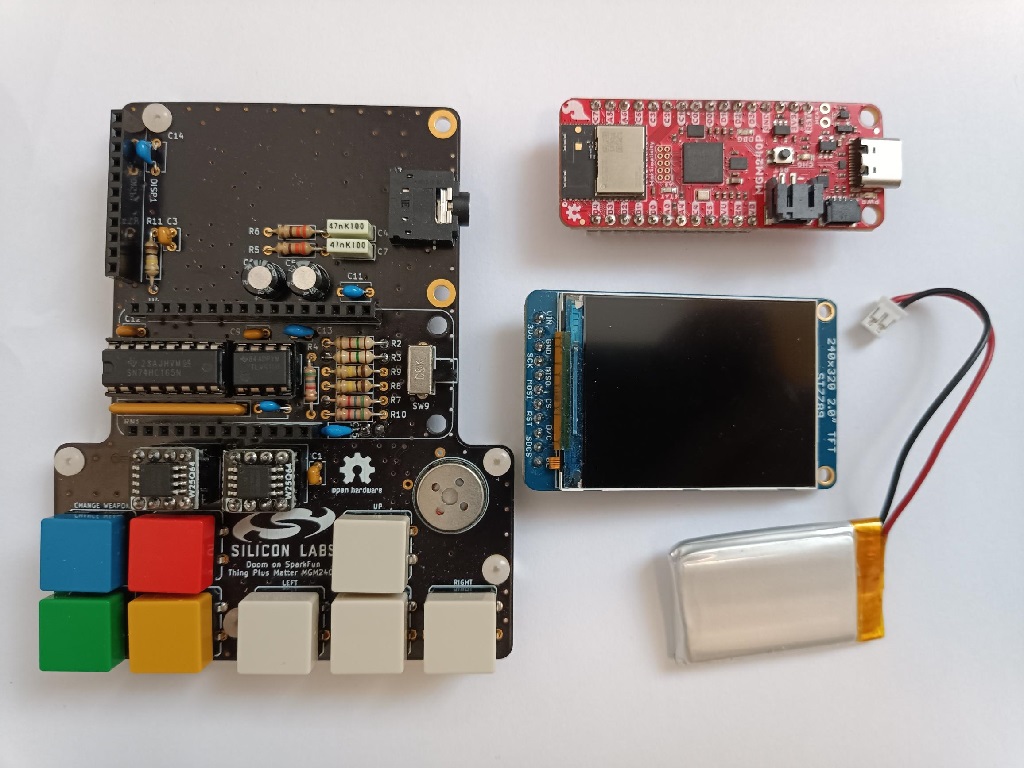
There is only one component on the back, which is used to connect the mini speaker, if desired. We suggest to fix the speaker with a drop of hot glue.
Note! The board supports a Li-Po battery but:
- Check the polarity. Different manufacturers use different polarities!
- We strongly recommend to remove the battery when not in use. This is because the R2 resistor value in the Sparkfun board is very low: 10kOhm. This means that a constant 360uA current will flow out of the battery even when the device is in off state, which means that in about one month the battery will completely drain out. If you want to keep your battery on, you might consider replacing the R2 with 1-10 M Ohm resistor (only for experts!). In one of our boards we have replaced the R2 with one 10-MOhm 0402 resistor. The current consumption when the device is in the OFF state is about 3.5 uA. Since 10 MOhm load would lead to only 360 nA discharge current, and the XC6222 LDO has a typical off-state current of 100 nA we think that about 3uA are due to the MCP73831 charger leakage as one can see from the MCP73831 datasheet. Using 1 MOhm we will therefore expect a 6-7.2 uA leakage current.
Downloading, Importing, Building and Flashing the project.
This is a Simplicity Studio 5 project. You can download it from Silicon Lab’s website. Please make sure you have all the required GSDK components (in particular BLE SDK), because, due to the GSDK license, the gecko_sdk directory is not present in the project repository.
Note: for now only gecko SDK 4.3.2 is supported. The most recent GSDK 4.4.0 is not supported yet.
You might want either to rebuild the sources (option 1) or to directly flash the s37 files to your device (options 2 or 3).
Option 1: Building The Source
You need to download the repository and unzip it somewhere on your PC. We recommend to unzip into a folder with a short path (e.g. C:\MyDir\) because on some systems, long paths could cause missing file errors.
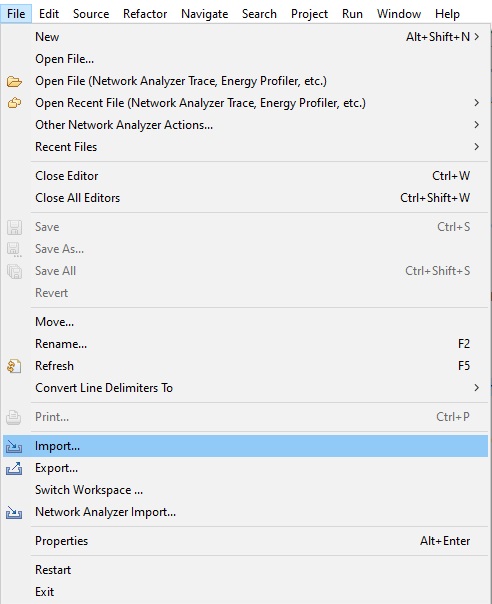
After you have unzipped the file, you must select from Simplicity Studio “File->Import”.
Find the project directory using browse and select the .sls option (the most stable):
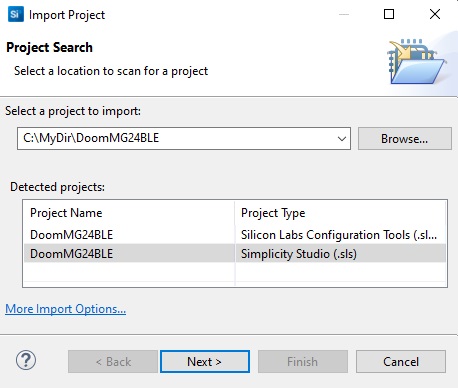
Next, follow the instructions in the Wizard.
Now, you must force the project generation, otherwise the GSDK files will be missing and the project building will fail. This is because of the GSDK license, which prevent it from being included in this project (which instead is GPLv2). To do this, as shown below:
- double click on the slcp file in the Project Explorer
- On the right pane close to “Project Details”, click on the 3 dots “…”.
- Click on “Force Generation”

After some time, the directory gecko_sdk_4.x.y (e.g. gecko_sdk_4.3.2) will appear in the file list:

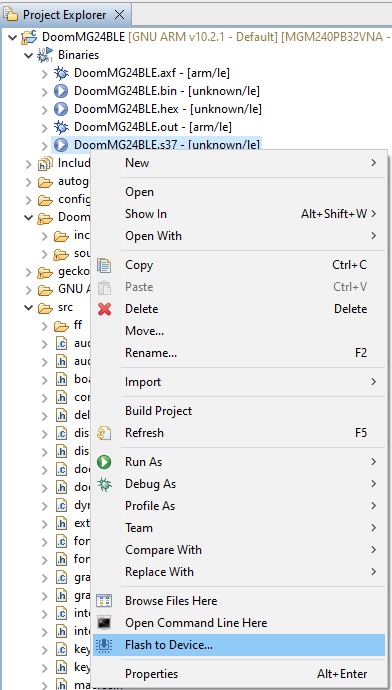
Now you can build the project (project->build Project) and flash it to your device. To do this, connect the board to the PC using an USB-C cable amd make sure that the RED power LED close to the USB connector is on. If it is off, check the side switch on the right side, under the Sparkfun Board. Then, find the binaries, and click on “Flash device”.
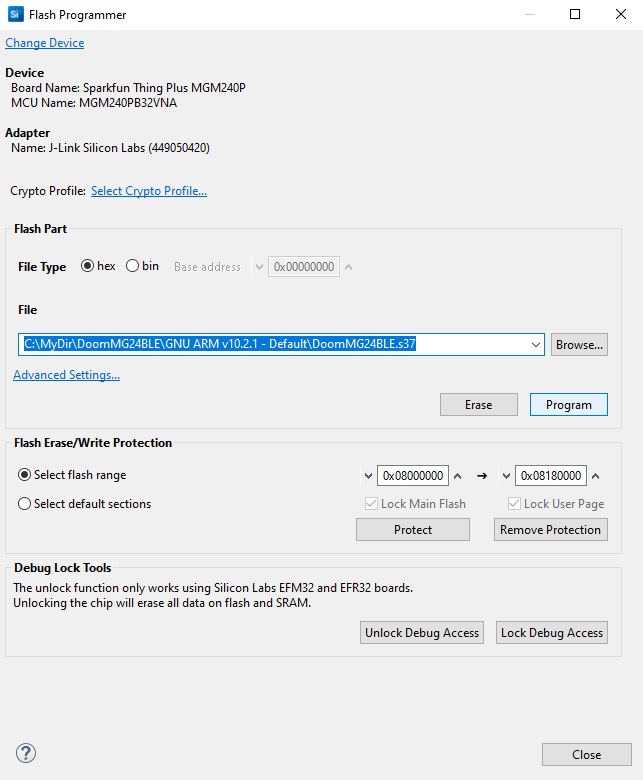
The following window will appear: press program.
Now you will have to upload the WAD, as described below.
Option 2: directly program the binaries using Simplicity Studio Flash Programmer
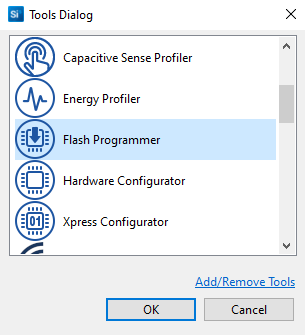
You can directly open the flash programmer directly by clicking on tools (see picture) and selecting the Flash Commander, without having to rebuild.

When the Flash Programmer window will open (see Option 1 for screenshot), click on browse and find the s37, file and then click on program. After that, you can continue to next section for WAD upload.
Option 3: use J-Flash LITE.
You can also use any J-link programmer such as J-Flash LITE.
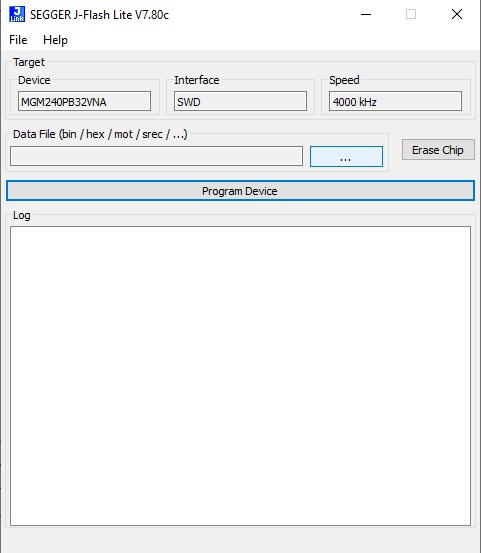
After you have downloaded, connect the board with the USB cable to a PC and make sure the device is powered on (you’ll see the red LED on). Then, open J-Flash LITE and make sure that the device is recognized as below:
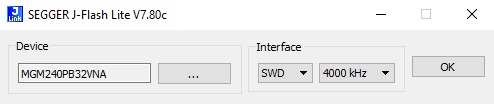
If it is not recognized, click on the “…” button and enter MGM240PB32VNA manually. Press ok and the following window will appear:
Click on the “…” button near to “Erase Chip”, and find the DoomMG24BLE.s37 file (it is in the “GNU ARM v10.2.1 – Default” subdirectory).
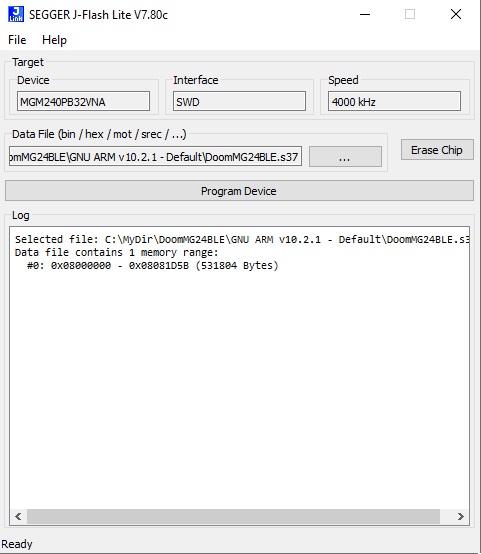
After you have selected the file, press on program device. It will take few seconds.
Then you can continue with WAD upload (see below).
WAD File Converter and WAD Upload
Beside the actual port, a WAD utility (based on Doomhack’s GBA Wad Utility, ported to C and added different functionalities) has been created. This is used to:
- Manipulate WAD data so that these can be read by the port. In particular composite textures are expanded, to strongly improve performance.
- Add multiplayer menu items.
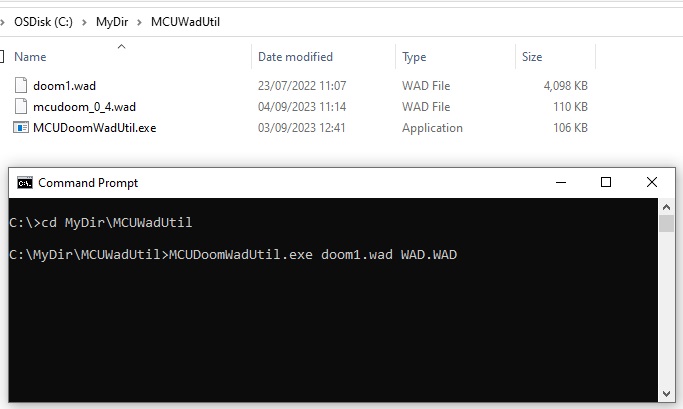
To do this, one must take the MCUDoomWadUtil.exe, executable, place it in the same directory as the “mcuDoom_0_4.wad”, open a command line interface and write:
MCUDoomWadUtil.exe inputWadFile outputWadFile
For instance, to convert the shareware Doom1.wad file to WAD.WAD one has to write in a command line:
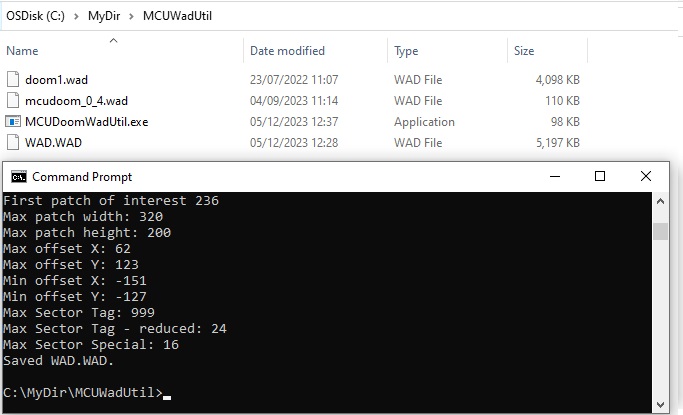
MCUDoomWadUtil.exe Doom1.wad WAD.WAD
The utility will usually take no time to generate the converted file.
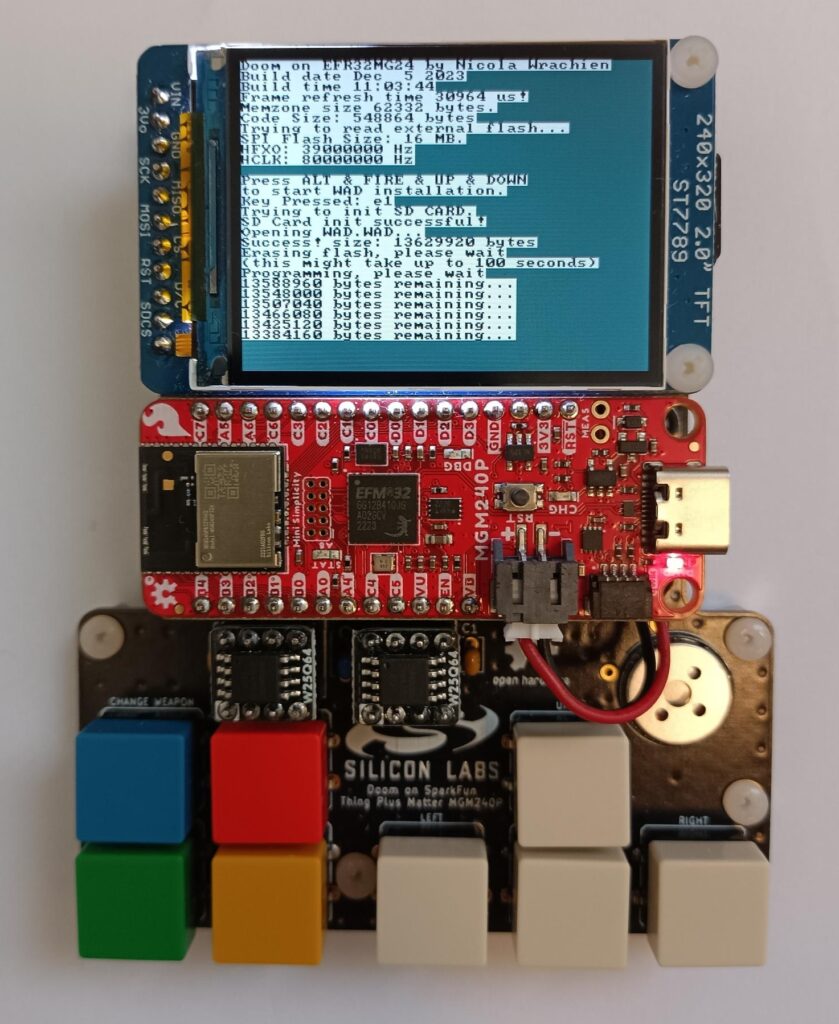
To upload the modified WAD.WAD file, you can use a microSD card, or you can upload it via Y-MODEM, using for instance Teraterm. We strongly suggest the SD card, because it’s much faster and reliable. In case you use a micro SD card, copy in it the WAD.WAD file (it must be named this way!).
To initiate WAD upload:
- Insert the SD Card (or open Teraterm, and connect the device via USB). The SD card holder is on the back side of the display module, on the right edge.
- Reset/Power on your device.
- press and hold UP-DOWN and ALT-FIRE for some seconds.
- If the SD card is found, then flash erase and wad copy will follow. Otherwise you must use send the file via Y-Modem through Teraterm.
Note: when using SD card, full chip erase will be performed on the external flash. This will take up to 100 seconds. After that the file will be copied with a speed of about 250-300 kB per second. The Y-MODEM upload has a much slower speed (about 5 kB/s). After the WAD has been uploaded, the device will reboot in 2 seconds.
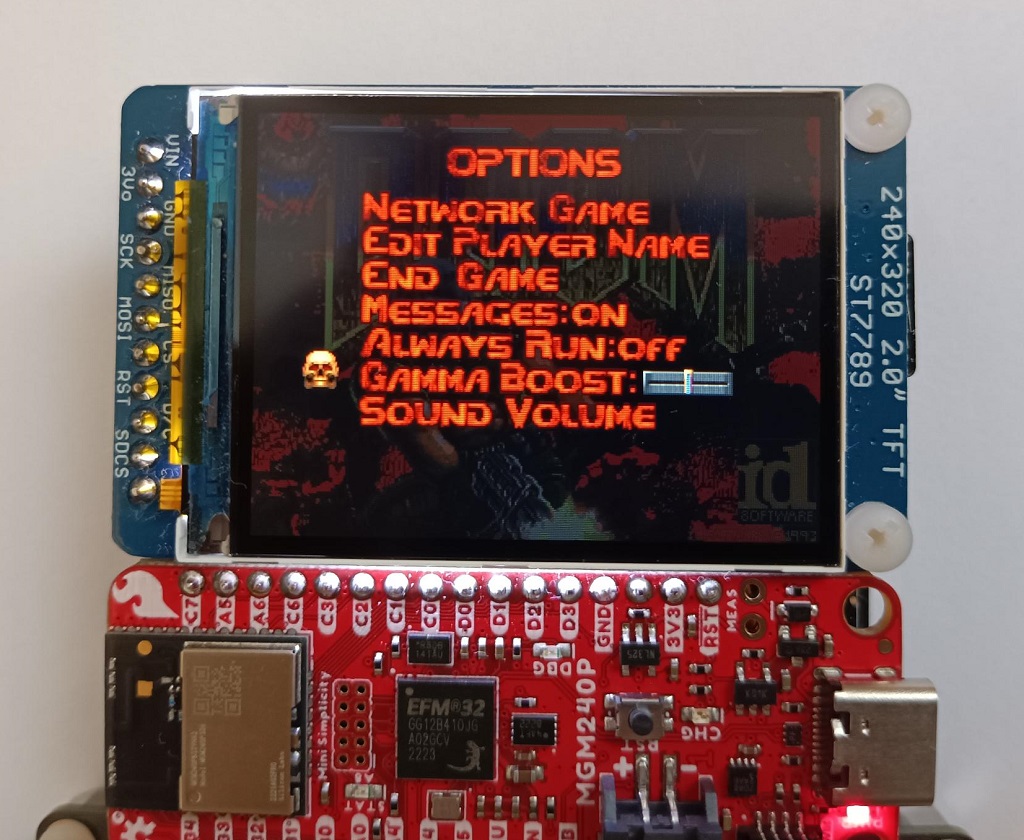
Notice! After the WAD file has been updated, settings will be lost, if the device has been programmed through SD card. We strongly suggest to increase the Gamma Boost, otherwise the screen will be very dark.
Porting Details

Warning! This section contains very boring technical discussions. We decline any responsibility if you will fall asleep.
This project is based on the previous one, so we won’t repeat every detail again. We will focus only on the changes.
External Flash Support
Doom stores all the data in a large file (the WAD) that won’t fit the 1.5 MB internal one: external flash memory is required.
In the previous project we used a single quad-SPI (QSPI) memory, clocked at 32 MHz, which provided an up-to 16 MB/s transfer rate. The EFR32MG24 does not support QSPI memories, so we used two separate 8-MB SPI memories. A single 16-MB SPI would have been much cheaper, but using two SPIs allows to almost double the throughput. We could have implemented a software-emulated dual SPI (DSPI), but this would required a perfect synchronization between the two SPI clocks, which would have prevented the usage of the DMA, which would instead increase speed (see later). Also, the software-emulated DSPI requires to interleave the address bits for correct operation, an operation which would increase the access time. While this latency has a minimal impact when reading a large amount of data, it will detrimental when a lot of randomly located data needs to be read.
Using two external SPI memories, rather than a single one, has, beside cost, the additional drawback of increasing the number of GPIO required (7 vs 4).
Noticeably, the external flash is not memory mapped, like in many other systems, therefore accessing the data is not as easy as dereferencing a pointer. This means that appropriate functions had to be implemented.
Also, note that we are using the EUSARTs at 40 MHz, whereas the EFR32MG24 reference manual limits to 20 MHz (although the datasheet does not put any limit). This allows us to get a peak throughput of 10MB/s with large enough data.
During development of the driver, we tried to reduce latency as much as possible, while allowing for DMA operation, which will be beneficial when rendering sprites and textures.
RAM optimization
In the previous port we have made several RAM optimizations, which won’t be repeated here. However, the following new features increase RAM usage:
- Bigger screen. A 320×240 8-bpp double buffered screen requires 150 kB RAM (75kB per buffer). A 240×240 required only 112.5kB). This alone represents almost a 40kB increase.
- Bigger screen not only means bigger buffer, but also larger data structures. For instance, now a pixel can have a x-coordinate which is larger than 255, i.e. it won’t fit in a single byte, increasing memory usage. Other structures, such as visplanes have some members whose size is proportional to the horizontal resolution as well.
- BLE stack. The stack requires some kB RAM for its internal working, and it needs also a minimum stack size of around 4kB. In the previous ports, we used a trick to reduce the stack size, by noting that a big stack is required mostly when dealing with game-logic (a lot of recursion is used there) and audio generation. These operations are done at specific times, when one of the two big graphics buffers are not used, therefore we temporarily relocated the stack there. However, this cannot be done for BLE as well, because BLE interrupts which can occur at any time. The trick can be still used for audio and game logic, but the minimum stack size, which was determined by the 3D rendering engine, is now determined by BLE.
- Network game. We need some buffers to store the incoming and outgoing commands from all the peers. Additionally, some RAM is required to store the host and client data.
- OPL2 emulation for music.
- Double buffered graphics, and increased screen size. Double buffer is mandatory to get a decent speed, and the increased framebuffer (from 160×240 to 320×240) doubles the memory requirements, per buffer. Combined, a double buffered 320×240 8bpp screen will require 152 kB (2 kB extra are required for 8-to-16-bit conversion, as the display uses 16 bits per pixels), which that about 60% of the RAM is used for just for the display.
Considering that video frame buffer takes 150 kB (plus 2kB additional buffers for converting 8bpp to 16 bpp data on the fly), we have only 104 kB for the game, audio, music, BLE and networking. Thanks to the previously mentioned RAM optimization started in late 2021, we were able to fit everything.
Some of those optimizations are related to statically allocated structures, such as visprites. Optimizing statically allocated data allows to leave more RAM for dynamic allocation, given the same system RAM amount. Optimizing the size of the dynamically allocated data structures, on the other hand, allows to require a smaller dynamic memory region, which leaves free RAM to be used for implementing other stuff.
In the following we cite a partial list of new optimizations, which were introduced.
Constant data: stay off from RAM!
In the previous ports, data that was recognized as being constant was not loaded to RAM.
However, we found that there was still a lot of constant data loaded to RAM. A first new optimization was to split structures, which contained both constant and variable data. In the previous port, this was already partially done for the Doom map object structures (mobj_t), by recognizing that from the object type some values could be univocally retrieved from a table. However, to save more RAM, we had to optimize other structures, such as the “sector_t”. By splitting these structures in two parts, one containing only constant data, and one part containing only variable data, further savings were possible.
Splitting structures was not the only way to prevent constant data from being loaded to RAM. In some cases, for instance, a 32-bit word is used to store both constant and variable flags. To reduce RAM usage, such flags were separated in two parts, one constant and one variable.
Memory allocator optimization
In the previous ports, we have already optimized the memory allocator, as well as the pooled memory allocator provided by PrBOOM, bringing the overhead of a single object down from 28 bytes to 8 bytes per object. In a pool, the overhead was optimized down to 1 byte/object, but the pool size was 16 items in the previous port. Large pools are problematic, because if you exceed by just only one element, you have to allocate a big chunk of RAM anyway, despite actually using a fraction of it.
In this port, we removed the block size field, which is calculated on the fly when needed, and we noted that the “user” field was not used for mobj_t objects. If a memory block is declared as pool, then such field is used as bitfield to identify which sub block has been used. This allows to get 1 byte/object overhead with pools as small as 8 elements.
Data Structure modifications
New modifications, with respect to the previous port, include:
- Converting arrays of structures holding few bits of data, in bitfield arrays. After splitting some structures in their constant and variable counterparts, their variable counterparts required only few Boolean flags (e.g. 3). Since the minimum structure size is 1 byte, this means that, instead of using 3 bits, we are using 8 bits per element, wasting 5. If there are 1000 elements, we would use 1kB to store only 3kbits. We therefore split the structure in 3, creating one array per flag. If we want to read the first flag of the n-th element, we have to read the n/8-th element of the corresponding array, and examine the “n mod 8”-th (the rest of the division between n and 8) bit. This is horrible from an OOP viewpoint, but allows us to save some kB.
For instance, the line_t structure originally stored in the “special” field the fact that it had special properties (e.g. because it is a switch which can be pressed). Instead of storing the actual special value to RAM, we stored the initial “special” value (const_special) to the line_t now residing completely in flash. However, a 1-bit flag is still required to mark if that line is still special after being used (e.g. a press-once switch). This is stored in a separate array, and accessed as described above. - Unions are used as well, as they can be used to reuse the same memory for different purposes, depending on which objects we are dealing with. For instance, missiles and enemies will have a field indicating the target they are chasing. This field would be meaningless for players, where instead they might need to identify the corpse in case of death. If both these two fields were separate (as in PrBoom) in the object structure, its size would be larger.
- Some structures such as visprites (visible sprites) use additional members, which could be derived from the other members with quite simple operations. While this can give some speed increase (and in 1993 era this was the crucial point), it is nowadays just a waste of RAM in a modern MCU. Such fields were removed, and their value calculated when needed by adding a minor computational overhead.
- A clever idea that was made by Kilograham in his RP2040 Doom port (see Credits) and was included here in March 2022: Doom makes heavy uses of iterators during game logic, for instance for sound propagations or checking object position. Traversing a 2-D mesh, such as the set of lines or sectors in the 2-D level map, might end up in visiting a node twice, with wrong results, loss of performance or even endless loops or stack overflow. Therefore, each object should have a flag to determine if it has been already visited. Using a flag would require to clear all the flags before – or after – performing the iteration procedure, which would take a noticeable amount of time and memory accesses on big maps. To overcome this, the original Doom code used a 32-bit global counter, which is incremented before starting the iteration. Each node has its own 32-bit last counter value, instead of a flag. When a node is visited, its counter value is compared to the global value: if they are equal, it means that the node has been visited so it is discarded. Otherwise, the node’s counter field is set as the global value (to mark it as visited) and the node is processed. This was a very clever way back in the 1993, because it’s very fast. However, it means that each object shall have a 32-bit field just for this operation (we have actually found in the previous port that everything works well with a smaller value as well). Kilograham instead used a separate bitfield array, where each bit of each element defines the state – visited or not – of an object (line or sector). To clear the (visited state) a memset operation is performed. If we use 32-bit integer arrays, the state is determined by the “n mod 32”-th bit of the n/32-th element of the array. When clearing the array, we write 0, clear the state of 32 sectors/lines at once. In very large maps, there might be around 2000 lines, and this would save up 8kB (actually in the previous port we limited the validcount field to a smaller size, so the memory saving is smaller). The drawback of this solution is that we need to do additional operations to get the right bit, and we need to clear the array afterwards: not a big issue for a CPU as powerful as ours.
Fixed point resolution reduction
As said, Doom uses 16.16 fixed point arithmetic for x, y, and z coordinates. However, z coordinates have a much more limited range, both in terms of maximum/minimum height, and also precision. Therefore 13.3 arithmetic was used instead, saving 2 bytes. The same applies for z-movement moment. In particular platforms have only 1/8 speed granularity, therefore 16 bit precision would be wasteful (3 are enough). Analogously, angles used 32-bit integers, whereas 13-bit integers are enough (sine and cosine tabulate values have only 8192 elements).
New Object classification
In the previous ports we already have classified objects as static and regular, allowing to save a lot of RAM. Static objects do not have, for instance, momentum, their x-y position is fixed, and do not have AI-related functionalities.
The static classification now has been split further into two subclasses:
- Really static object. X-Y coordinates are not even stored. Instead, an index to an element in array in flash, storing the coordinate is used (it also stores the object type for deathmatch item respawn). This kind of objects includes bonuses present in the map, or decorations.
- Partially static objects. These include bonuses dropped off when an enemy is killed, and player corpses, in deathmatch. The x-y position is not determined a-priori because they depend on where the object was, before being killed. For this reason, instead of an index, a short pointer to a RAM location, storing the X-Y coordinates is used instead (due to unions, this short pointer actually takes the same position of the previously mentioned index). Such X-Y coordinate object is stored in a memory pool, to reduce overhead. This additional X-Y object takes 9 bytes (including overhead).
After these optimizations, the RAM cost of each static object is 20 and 29 bytes for fully and partially static object (was 44 on our previous port). The full mojb_t is instead 52 bytes (was 92 on our previous port).
In the shareware Doom wad, the most memory-intensive level is E1M6 with 463 object, not counting dynamic ones such as bullets or dropped bonuses, and about half of them are fully static. With this new classification, and after the optimization described above, we waved about 16 kB.
Newer is better? Not always.
Beside switching back to original Z-zone allocator (and of course optimizing it even more as described above), we had to revert some changes that were made in PrBoom, with respect to the original Doom code. For instance, PrBoom introduced a structure, called “msecnode”, which holds information about which sectors a thing touches (a thing has a non-zero radius, therefore it can touch more than one sector). This information is used for instance, to assess if damage or friction must be applied to an object. Such structure allows for faster and more accurate (and less buggy) calculations, but it requires a lot of RAM (even after using short pointer, about 6kB are used in the biggest levels). We switched back to original Doom implementation, but much more compact in terms of RAM.
Speed optimization
In this project we have a core which is 1.5 times faster than the previous one, but a bigger screen as well. Furthermore, we have BLE and music. In the past port we already have done a lot of optimizations including:
- Double buffering.
- Caching data to flash (with particular focus on randomly accessed one). Noticeably, this time we have 1.5MB, which means that more data can be stored in flash.
- DMA-assisted asynchronous texture-sprite column load from external flash, with simultaneous rendering of the previously loaded one.
- Skipping column reload if it’s the same as the previous one (e.g. when walls or sprites are close to the screen)
- Improved floor/ceiling rendering (by using internal register to store 4 pixels and writing back to memory, instead of writing every time a single byte).
- Composite texture pre-expansion in the WAD file (to avoid having to pre-render the column on the fly, which takes a lot of time because many textures might have to be loaded)
- Modifying the patch format so that the data size is known in advance (useful for variable-size columns for partially transparent textures or for sprites, so that DMA can be used).
- Colormap caching to RAM.
As we will discuss later, we found that the optimization we made in the previous port were enough for this as well, despite the presence of bigger display, networking and music!
There are only two minor variation we made. The first about colormap caching. Doom uses colormaps to create brighter/darker shades, and each colormap is a 256-byte remap table, which maps the original colors in darker-brighter versions of the same palette. When rendering a column, a pixel in the texture/sprite is taken, and then fed to a colormap table (depending on the illumination level), which is then stored in the rendering buffer.
In the previous port, we copied the colormap to RAM when it was determined that it would have been used for many pixels: copying the colormap to from flash to RAM has a cost, but once it’s copied, the performance gain is measurable, especially when there are large sectors to be drawn (because each sector has same luminosity level). This is what is enable by default in this port when the resolution is 320×240, because, in this case, the speed is limited by the SPI frequency, which caps the framerate to 32.6 fps at most. However, when the smaller (original) 320×200 resolution is used, we have much more RAM, so we can use more of it for caching all the possible color maps to RAM. Since there are 34 colormaps, this means an additional 8.25 kB usage (34 x 4 is 8.5, but in the previous case we are still using 0.25 kB anyway), which is offset by the 22 kB smaller double buffer size.
The second optimization is about caching to internal flash all the lump names (8 bytes/lump). This allows to speed up a lot the menu drawing, especially if menu is turned on during gameplay. This is because menu items, which are stored as images, are referenced by names. Finding where a lump is stored in the WAD requires to read many lump names, which is extremely expensive (about 5 microseconds per read lump name) because they are stored in the external flash. If for instance, 1000 lumps names are read to draw a menu, this would take 5 ms. If the current scene is rendered at 30 fps (33 ms/frame), when menu are turned on, the frame rate would drop to 26 fps). Yes, you are not expected to play when the menu is on, but it was still something that was bothering us!
Now that the lumps are stored in the internal flash, reading a name takes few clock cycles, which is at least one order of magnitude faster than before. Assuming, very conservatively, 500 ns per read name, in the same situation as written above, the frame rate would decrease from 30fps to 29.6 fps.
Audio
The audio subsystem differs from the previous ports because:
- Music is implemented.
- DAC + DMA, instead of PWM + DMA, is used.
- Sound effects are stereo, like in Doom.
Sound effects and music are handled separately in two buffers, and mixer later together in a stereo channel output. If we exclude the actual audio generation, the core of the sound effect is exactly the same as the previous port, with minor modifications, therefore it is not discussed here. The only thing worth of remembering is that sound effects are not deterministic: on every frame we must fill the entire sound effect buffer, which can contain 92ms of data (1024 samples at 11025 Hz), because a priory we don’t know how long the next time will take to be rendered, and we don’t want any audio glitches even if the frame takes this long. However, the frame will hopefully take much less (30 ms or so), and in the meantime new sound effects might have been triggered (e.g. the player shooting). For this reason, we have always to recalculate the full audio buffer (a much more efficient algorithm would be to recalculate the entire buffer only if new sound effects have been triggered, limiting sample generation only for the “consumed” buffer if no new sounds have been triggered).
Music instead was a blood bath. Both PrBoom and Chocolate Doom have OPL emulation (DBOPL and Nuked OPL3, respectively), but these are really meant for a rather powerful PC. Doom uses a subset of OPL2, which makes things easier. Still, the biggest issue is that OPL2 has 18 oscillators, called operators, which can be combined to generate up to 9 frequency modulated channels with vibrato, tremolo, attack, sustain decay and release, etc. Nuked OPL3 calculates each audio sample by iterating over all the channel, calculating the state of each operator. Once all the contribution of each channel is calculated, the next sample is generated.
In particular, the high-level procedure looks like the following snippet: (note: this is extremely simplified. We are not showing envelope generation, vibrato, tremolo, phase modulation and feedback):
For each sample to generate do:
    For each channel do:
        Load Channel/Operator parameters
        Calculate Next Sample of First Channel Oscillator
        Calculate Next Sample of Second Channel Oscillator*
        Generate Channel Audio Sample based on the values of the two oscillators
    Next channel
    Mix channel samples and store in buffer
Next sample
This means that for each computed sample, the CPU has to load from RAM a lot of operator parameters. If our buffer size contains S samples, the number of load operations is S multiplied by the number of operators, multiplied by the number of parameters of each operator (there are also channel-wide parameters as well). For instance, each operator has 12 parameters in 5 bytes. Assuming we are running at 30fps, we need every frame to generate about 370 new music audio samples. This means loading every frame about 80k parameters, which would take a considerable amount of time.
Instead, we swapped the inner and outer loops (again note: this is extremely simplified, we are not showing envelope generation, vibrato, tremolo, phase modulation and feedback):
For each channel do:
    Load Operator 1 parameters
    For each sample to generate do:
        Calculate sample of the first oscillator and store in buffer 1
    Next sample
    Load Operator 2 parameters
    For each sample To generate do:
        Calculate sample of the second oscillator* and store in buffer 2.
    Next sample
    For each sample To generate do:
        Create Channel sample and mix to final audio buffer
    Next sample
Next
(* Note that in both algorithms, the sample generated by the second oscillator might depend on the sample generated by the first one.)
As you can see, we do not have to load operator parameters for each sample, so the number of load operations from RAM is amortized by the number of actual samples generated (instead of 80000 there are only 90 parameters loaded each time).
Noticeably, unlike sound effects, music is deterministic, so there’s no need of recalculating the stream each frame: we just make sure to keep our circular buffer full, by calculating only new samples. That’s why, in our previous example, we said that if we are running at 30 fps, we have only to calculate 370 music audio samples.
The music generation code was tested creating a C tool, and comparing the samples with the Nuked OPL3 emulator found in Chocolate Doom. After ensuring these gave the same numerical results at the original 49kHz frequency, we started to make some simplifications/optimization, and although the numerical values are not the same values, we can’t spot the difference by playing the produced samples, using audacity. Such small modification arose for instance by changing some internal parameter update order.
Nuked OPL3 can generate audio even at different (lower) sample rates, with respect to original OPL3 chip. However, it does this by generating the samples at 49ksps, and then downsampling and filtering them. If we had to generate 49k samples per second, we would require a lot more computing power and memory. Therefore, we decided to directly produce the output at 11025 Hz, saving both memory and CPU time. The quality drop between 49k and 11k can be spotted even by a non trained ear, but it is not as bad as one might think. Noticeably, the 49ksps to 11ksps modification required to recalculate all the parameters.
Noticeably, Nuked OPL3 used a lot of RAM just to store few bytes worth of data, therefore it underwent the same optimization we made for rest of the Doom game.
Multiplayer over Bluetooth
Adding multiplayer via BLE was hard as well. The first issue was to restore all the multiplayer-related code, which was removed in Doomhack port (our previous port was based on Doomhack’s unofficial GBA Doom port). Then, new menu and graphics had to be added to create the multiplayer related settings like hosting network game settings and discovering/joining network games.
Finally transmitting and receiving all the data without impacting the performance was probably the hardest part.
Network game works as follows. The same firmware can work as server/host or client, and the choice is made in run-time by selecting “host” or “join” menu voices.
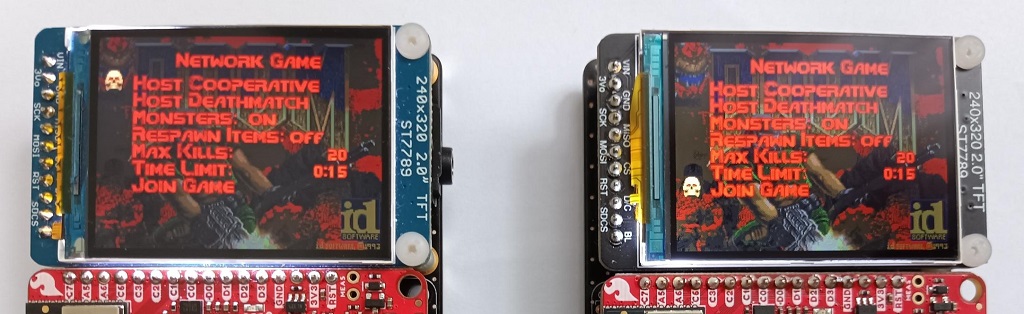
Servers hosting a game will start advertising (non connectable). In the advertising and scan response packet we put games settings, the server name (which corresponds to the player name), number of players, a special UUID128 service (to recognize a host) and a random number (this is to recognize which player wants to join which host).
Clients looking for servers, will start scanning, and if they find a device with that particular UUID, they will create a scan request, to get the game settings. Up to 4 different hosts can be listed at the same time. Being able to select only 4 hosts will sound ludicrously small for nowadays players, where they can choose for thousands of server on their favorite games. However, we find very unlikely that there will be so many of these Doom boards at the same time in the same place.
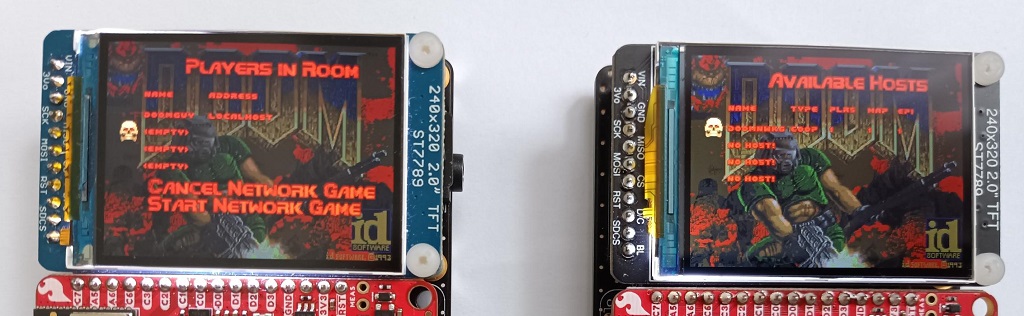
If the player willing to join a match selects one host, its board will start advertising its willingness to join, by putting the same random number that was advertised by the host.
At the same times, hosts will also scan for clients, and they will connect to those devices which feature a particular UUID128 service, and the same random number.
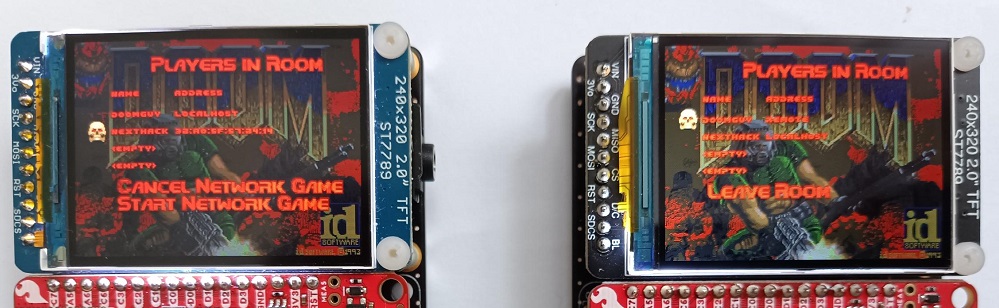
Once a client joined a host, the client can only decide to leave the room, or wait until the host starts the network game. The host can kick the client by selecting the player and pressing fire.
When the host starts the game, it asks the client to load the level, and when every board have finished loading, the match automatically starts.
Doom is designed to process the user input events 35 times per second, and for each one it calculates the game logic (enemy IA, bullets etc.). Each one of these 35 interval is called gametic. Ideally, on a powerful enough PC, you will be able to show 35 frames per second, one per gametic. If you have a slower PC, still 35 tics per second will be calculated, albeit not all of them will reach the screen.
In a network game, we must consider not only rendering time, but also the actual network time, which might introduce some lag, delays etc.
For this reason, each client will pre-buffer some input events corresponding to future gametics (future gametics are called maketics!), and it will send such series of inputs to the host. The host pre-buffers some of its input event as well. Different client might be in different situations, so they might have buffered a different number of tics. The host will check what is the minimum number of maketics generated by all the players (including the host itself) and it will send all such tics to each client.
Now, hosts and all the clients know exactly what are the other players’ game input events for the next few tics, so the game logic can process these data and achieve the same results on all the peers. The peers, in turn, can proceed buffering new maketics.
This strategy trades off speed/fluidity with lag. If a system is not fast enough to calculate next frame on time, this won’t necessarily impact on the frame rate of other players, it will simply increase the lag.
In an ideal scenario, each one of host/client should have enough additional buffered tics from all the players, to keep up with any kind of delay, including network. Since each tic is about 1/35 s, having 3 tics in the buffer means that the lag is 86 ms. Such a lag value might sound like unacceptable, but for 1993 standards that wasn’t too bad. Furthermore, unlike games made after 2000, Doom has partial auto-aiming, so it is very playable even with relatively high lag values.
Up to four players are supported, as in original Doom. The frame rate is between 30 and 31.4 fps.
Partial demo support
Doom used a clever way for demo playback. A demo file is simply a sequence of the user keypresses, recorded 35 times per second, one per each gametic, just as like as we explained before for multiplayer. Such data is then sent to the game engine (which is deterministic because pseudo random numbers are used), to playback the gameplay.
Demos are a very useful tool for two reasons:
- They allow to estimate the performance of a system and its particular Doom port. This is because Doom includes the “timedemo” functionality, for which that each gametic is rendered as fast as it can be done, without frame skipping if the game slows down, and without limiting the frame rate to 35 fps if it can be rendered faster. This allows both to check if any code modification was actually an optimization or not, and to make comparison with completely unrelated ports and hardware. For instance, if a demo is played at real game speed, it could take 100 seconds, if we always hit 35 fps. If our machine/port is slower/inefficient, the rendered might be slower, so each game tic will actually take more than 1/35 s, so the actual “timedemo” playing time will be longer. If our machine is so fast that it always renders at 70 fps, our timedemo playing time would be just 50 seconds.
- They are a good way to test if new code/optimization actually “broke” the game, due to obscure overflows etc.
If the game logic engine is not exactly the same as the one used during recording, the demo will go sooner or later out of sync (demo desync). PrBoom introduced many enhancements, especially on AI, so the game logic was changed. To overcome this, PrBoom code contained many “compatibility” switch checks in the code, in order to being able to playback old demos (in particular the 3 demos included in the original shareware Doom1.WAD file), without desync. Such checks were removed by Doomhack in his port, because they were just increasing code size and slowing down the game, without any real added value to the gameplay experience.
Finding where compatibility was lost was a very tedious task, and for each gametic, the player position was written in a console output, both on Chocolate Doom and in this port. When a mismatch occurred, then more analysis was required to find out where the compatibility was lost.
Strict demo compatibility is not really required for actual gameplay, as one would really not spot the difference. For this reason, so far we have just fixed all the issues found with the 3 demos of the shareware Doom WAD. For the commercial one, the demo compatibility is still not checked and might be broken.
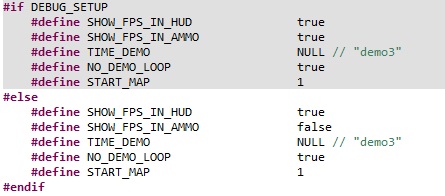
Note: demo is not enabled by default, one must enable it, by setting NO_DEMO_LOOP to false, in main.h file.
WARNING! Enabling demo will have two adverse effects:
- Between demo load, the console will be unresponsive for 10 seconds.
- This will wear-out the flash faster than normal gameplay (although, since a single demo typically takes some minutes, and it is played 4 times, it will take some entire months of non-stop demo replay to reach 10000 program/erase cycles).
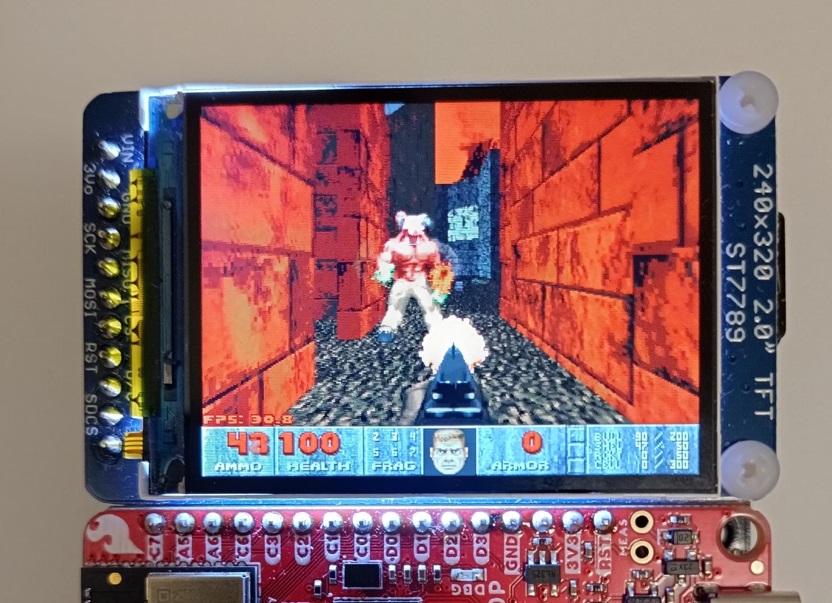
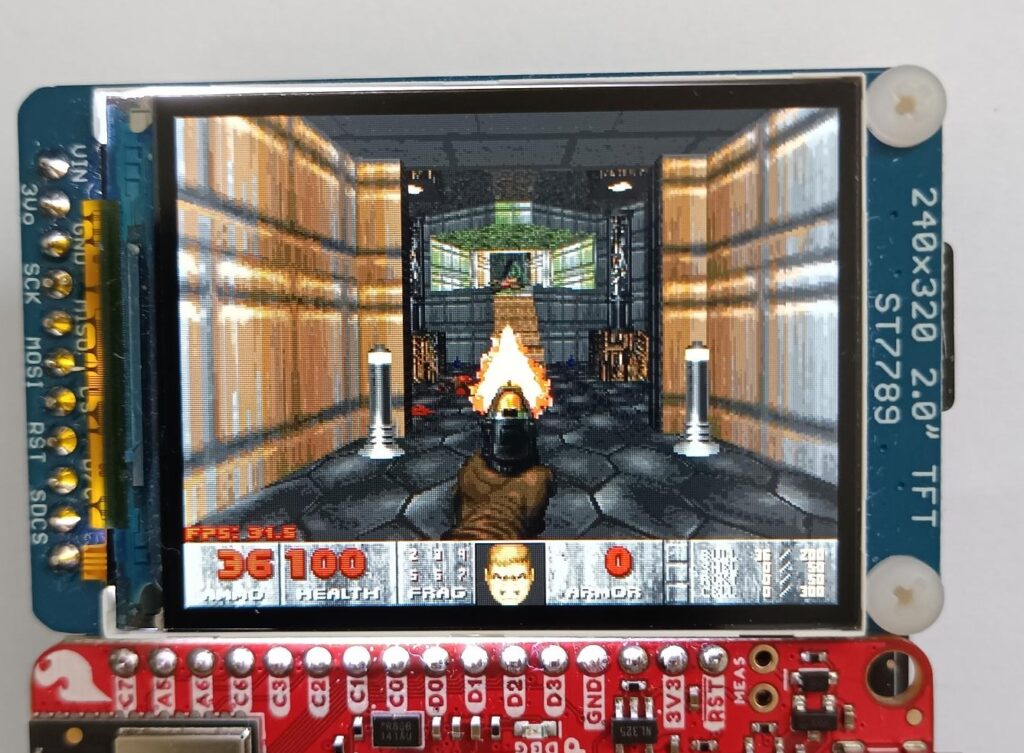
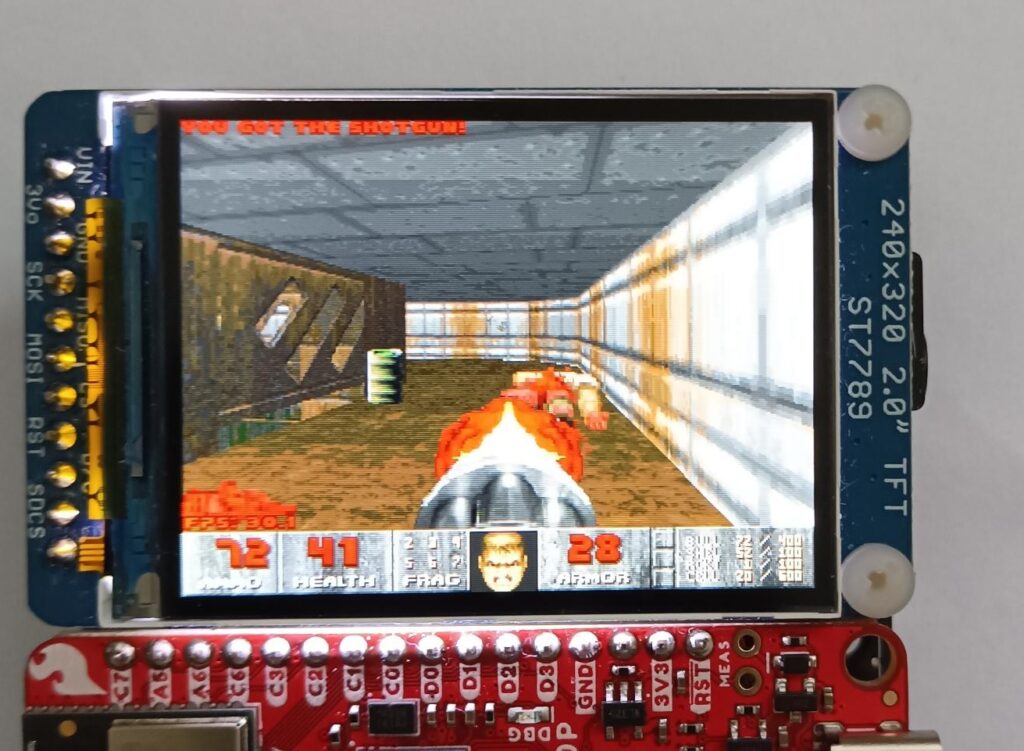
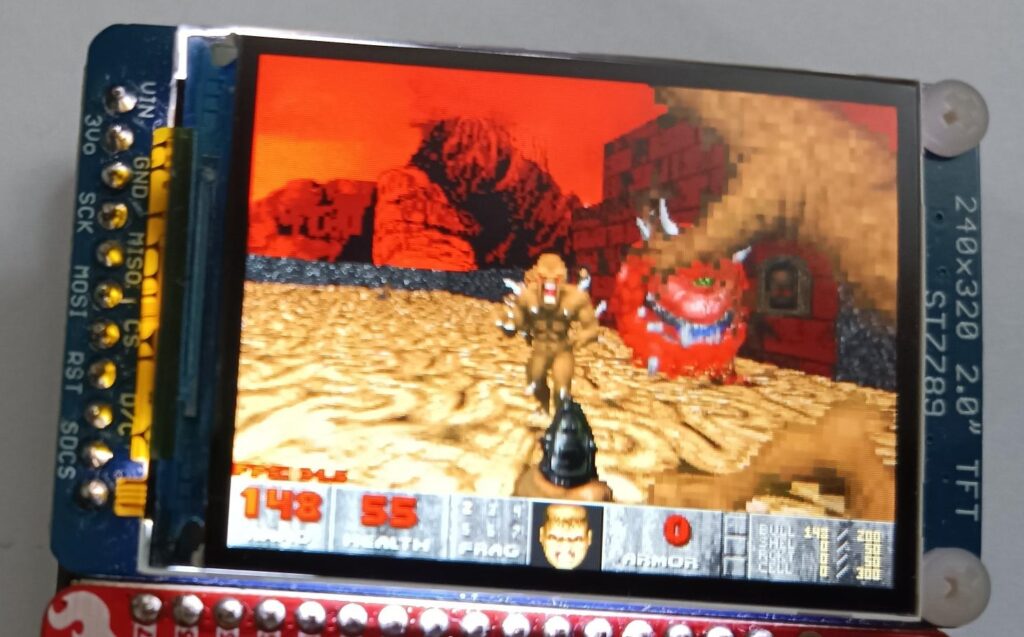
Results
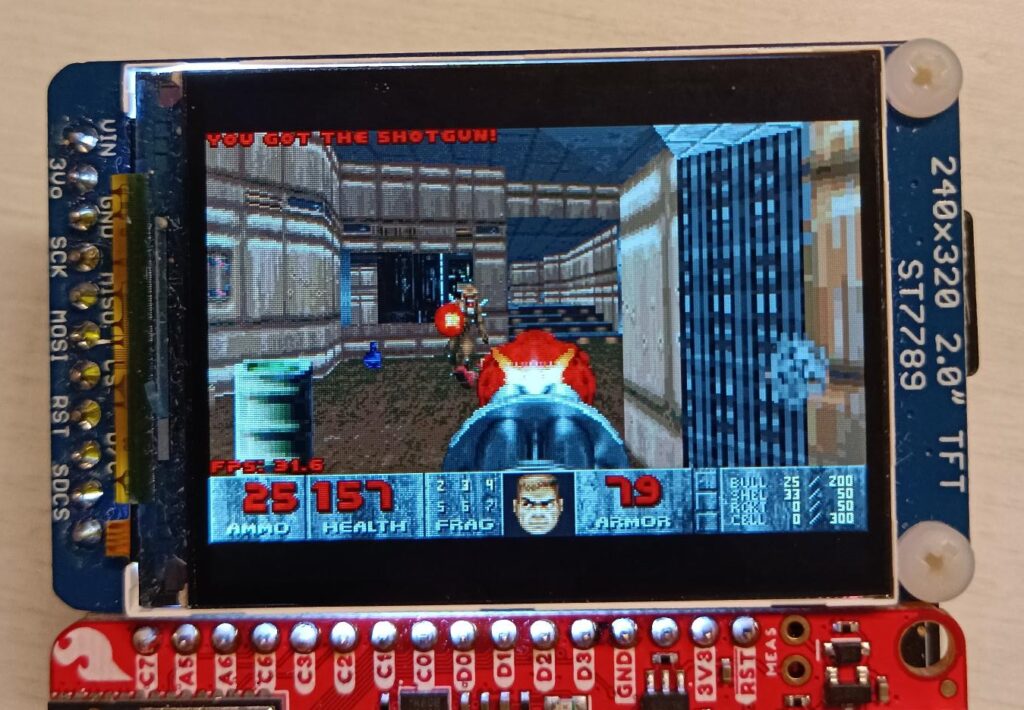
Here you can see some single-player results. Noticeably in the most chaotic situation on E1M3 we went down to 27 fps, due to many samples playing at the same time.
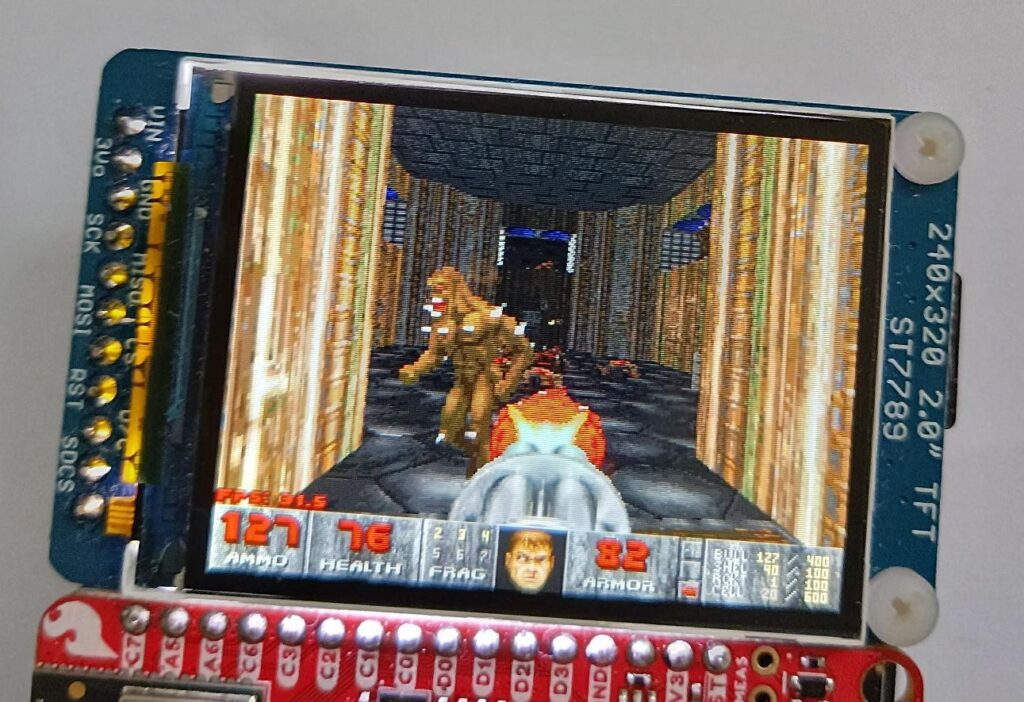
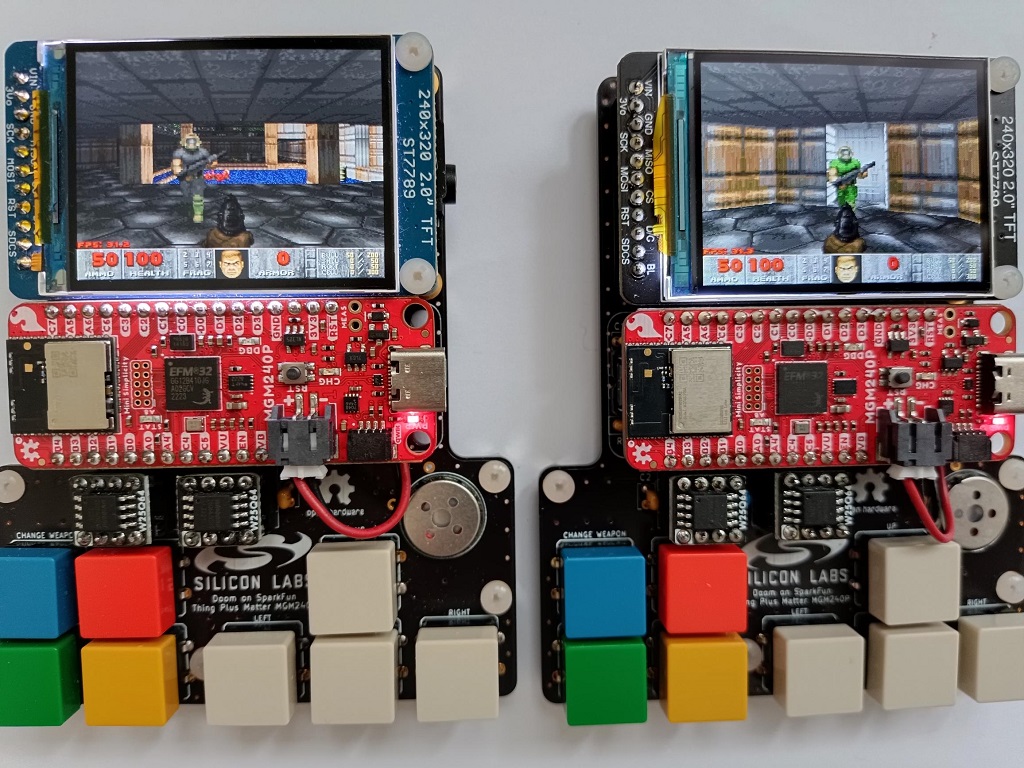
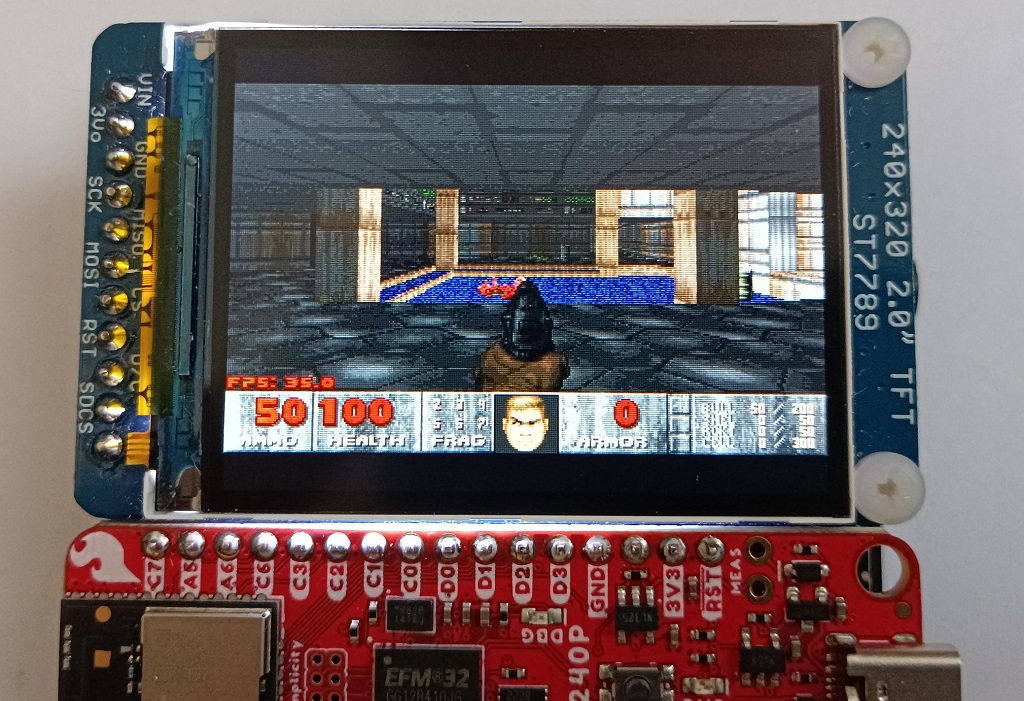
Here is some multiplayer action:
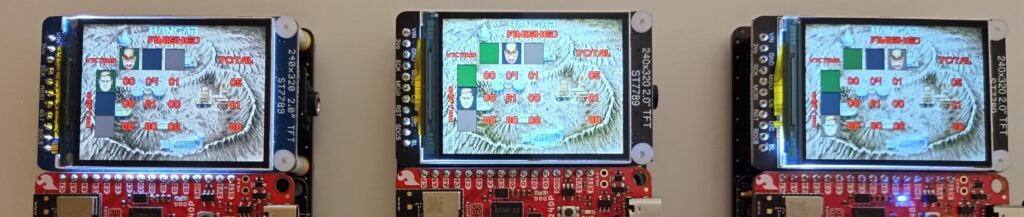

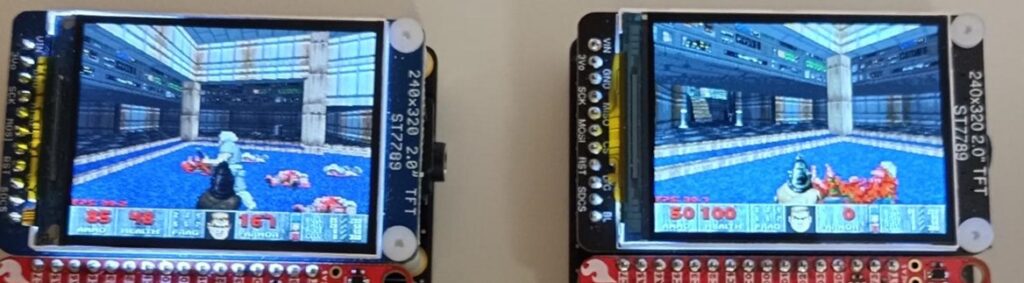
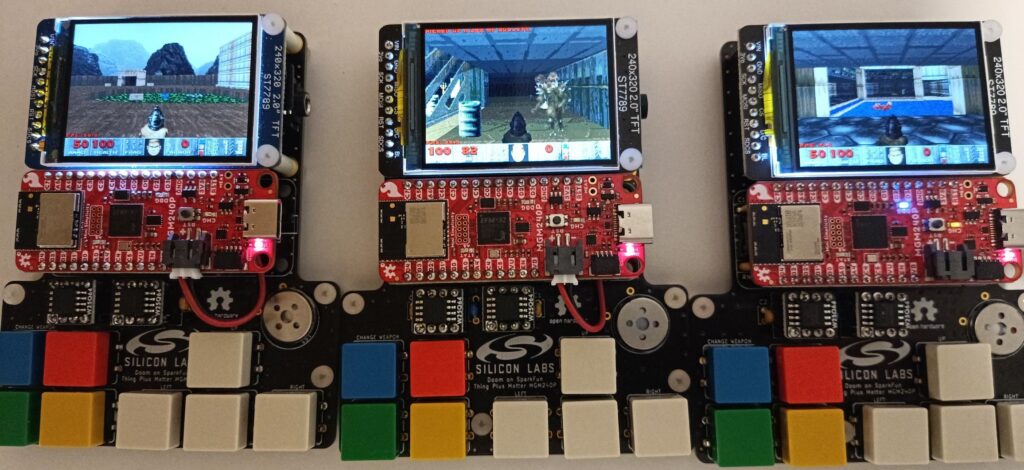
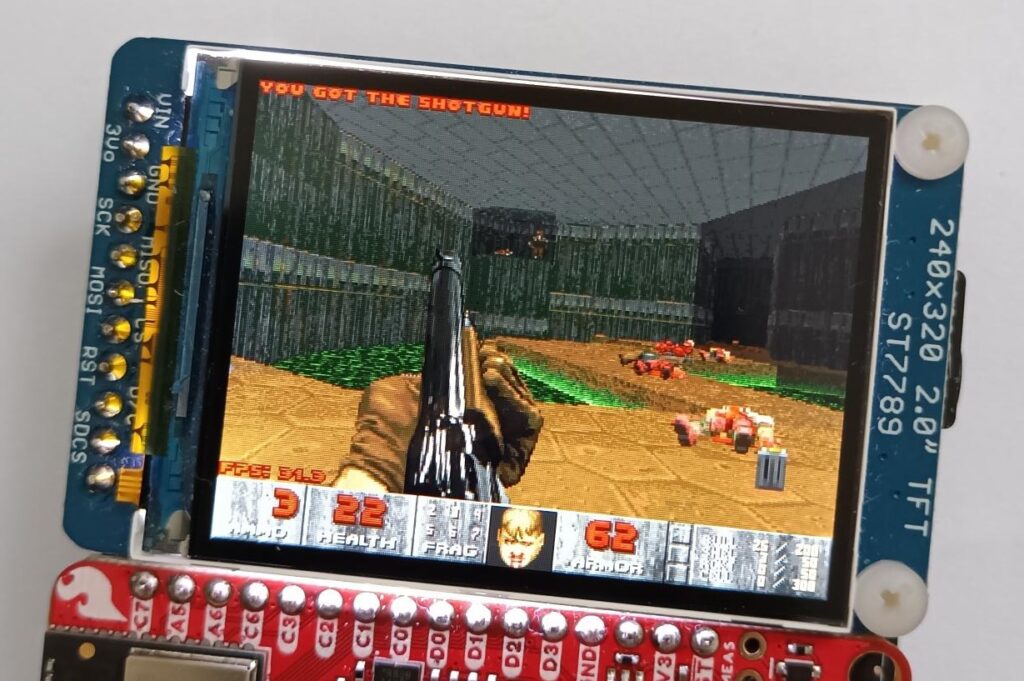
However, in general this port runs extremely fast, and the frame rate is typically above 30 fps even on most complex scenes, even at the largest resolution (320 x 240), which is 120% of the original Doom resolution. Even during multiplayer, the frame rate is typically around 30 fps, at the highest resolution, with 4 players and music.
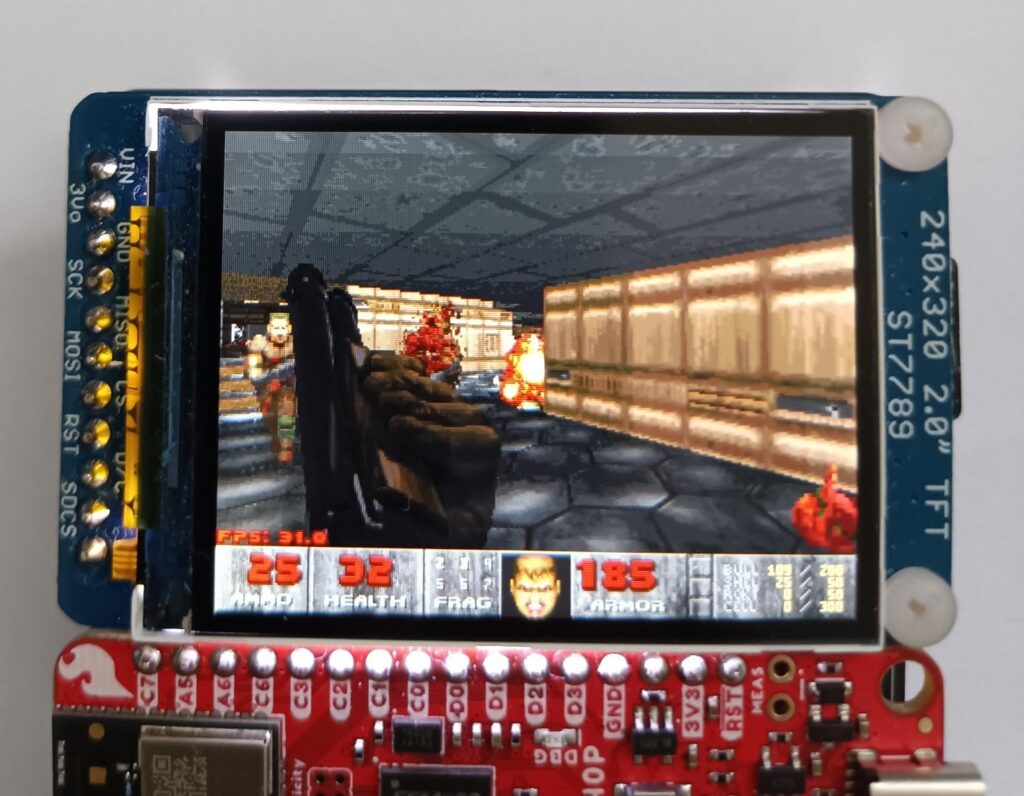
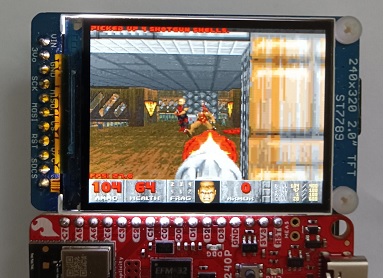
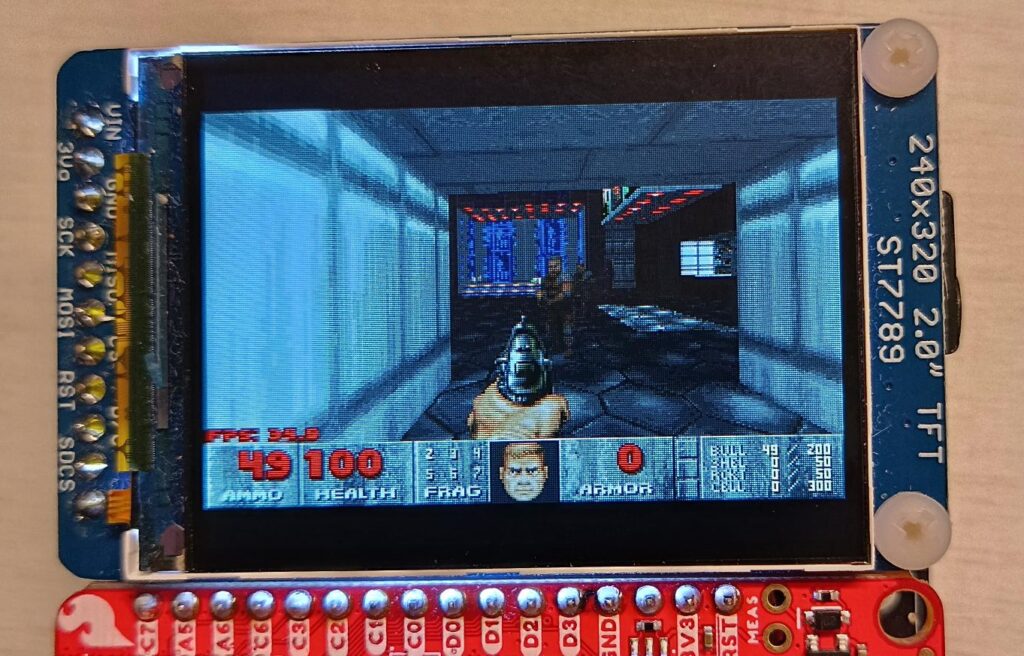
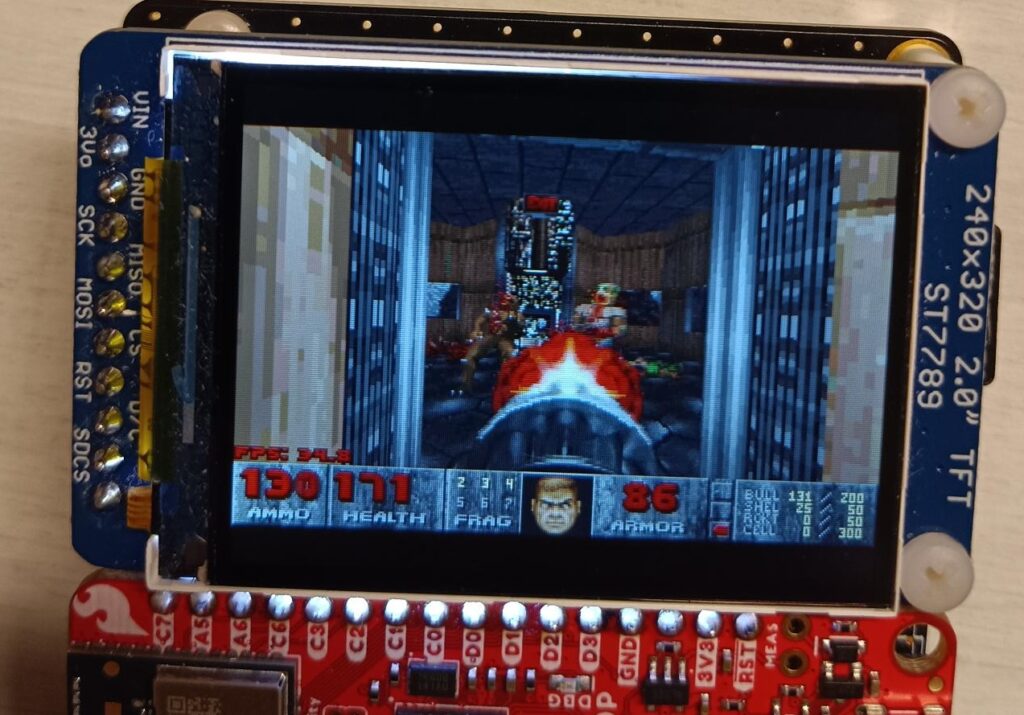
At the lowest resolution (320×200) the frame rate is typically 35 fps. This is the capped frame rate, because by removing the frame rate cap logic, we go much faster, as we will discuss later. Sometimes, however, when many audio samples are loaded, the frame rate drops (see images below) to about 31 fps.
Here are some actions in 320×200 pixel mode.

Comparison with previous ports.
This is neither the first Doom port to a memory-constrained device, nor the first one we have made so far.
Making an apple by apple comparison is hard, as almost all the ports feature different specifications. Furthermore, Doom has been ported to so many devices that it is impossible to list them all. We will cite only some of the most recent ones.
Unofficial Doom Port to GBA by Doomhack (https://github.com/Doomhack/GBADoom, September 2019. Our first port was based on November 2020 code base).
In 2020, Doomhack released a much better version of Doom for GBA. It was aimed to bring a more accurate Doom experience to the GBA with respect to the official port. The port included full game logic (including sound propagation, enemy to enemy fight), music, accurate maps, and more accurate 3D engine (including floors and ceilings). Initially (2020), everything was in low detail mode, i.e. each pixel is doubled in width, meaning that only half of the pixels need to be actually calculated (with a hardware trick, this also means that only one write per 2 pixels is required). Considering the 32-pixel tall status-bar, the number of 3D pixels is therefore only 15360 (240 x (160-32) / 2). Also, it was lacking screen-melt effect. Such limitations were removed in late 2021, backporting some of our code (see below). Multiplayer is however missing and composite textures are mip-map rendereded even at the closest distance (i.e. only one out of “n” columns are calculated and rendered). Also, the port lacks the z-depth lighting effect (farther objects/walls are darker). The frame rate varies a lot, being 22 and 16 fps in the first and second map of the first episode, respectively
Overall, this is a very solid port, especially considering the very modest computing power (a 17 MHz ARM7), the small memory (384kB) and the level it has reached so far.
Our last project (Released in November 2021)
The target device was a 64 MHz Cortex M4 with 256 kB embedded RAM, 1MB flash, and a QSPI 16-MB external flash memory. This was based on my previous port and included the following improvements:
- 240 x 240 pixel display (i.e. 49920 3D pixels, corresponding to 92% of original Doom 3D pixels).
- Option for custom wireless keyboard.
- Screen Melt effect (useless but iconic).
- A lot of speed optimization (which allows to get the hardware-limited – due to SPI frequency – 34.5 fps almost everywhere, in ultra-violence mode, despite the MCU having less performance and the screen having about 3 times the number of pixels as my previous project).
- Partial demo support (added in 2022).
This port still lacked multiplayer and music, but the speed was very high, even during the most chaotic scenes. Considering the much higher frame rate (34.5 vs 16 in E1M2), and the number of 3D pixels (3.25x), this port has the same optimization level of the unofficial GBA port, if not more (a 64 MHz Cortex M4 is roughly 5.5 times faster than a 17 MHz ARM7, but in our cases we are rendering as many as 7 times the number of pixels per seconds. Also, the 34.5 fps was limited by the maximum SPI clock, so one cannot determine if this is the actual value or it could have been faster).
Doom Port to RP2040 by Kilograham (March 2022)
In 2022, Kilograham released a nice port on the Raspberry Pi Pico RP2040 MCU (https://kilograham.github.io/rp2040-Doom/). Although it’s based on Chocolate Doom, in this optimization effort, the author took some inspiration from our first port to a 108kB RAM device (for instance, static objects and probably short pointers and a couple of other tricks as well). That port is the most accurate so far, i.e. it aims to reproduce the exact 1993 Dooms features, including high fidelity audio reproduction, demo and help/copyright screens. The port is focused also on cost effectiveness, and flash memory optimization. In fact, the RP2040 costs about 1$ and the WAD data was optimized to fit a 2MB (Shareware) or 8 MB (full version) flash. If one excludes the cost of a keyboard and an external monitor, this probably makes Kilograham’s system the cheapest one in which the full Doom can run. The system uses 266.25 kB RAM (256 k + some more from spare banks), and the 133 MHz RP2040 dual core Cortex M0+ is overclocked at 270 MHz, giving enough computing power for implementing byte-exact audio and on-the-fly data decompression (a dual-core Cortex M0 clocked at 270 MHz has roughly the same performance – excluding floating point – of a 324 MHz Cortex M33). Both data and code are in the external QSPI flash clocked at 135 MHz, with a peak of 67.5 MB/s (using the internal QSPI data cache, the peak speed for code read out reaches about 1 GB/s, at 270 MHz). This port also feature multiplayer over I2C bus, and the frame rate is between 30 and 35 fps.
As we discussed above, from this port, we took a very clever optimization made by Kilograham (using an array of bitfields instead of a counter on lines and sectors), allowing to reduce the number of bytes in some structures, saving about some kB RAM on the largest maps.
Arduino Nano ESP32 (2023)
Recently, in 2023 Naveen Kumar has released the project a small handheld console capable of playing Doom, using the Arduino Nano ESP32 (https://www.hackster.io/naveenbskumar/yes-arduino-nano-esp32-can-play-Doom-ccfde1). This project is based on Ducalex’s Retro-Go emulator (https://github.com/ducalex/retro-go), with very minor software modifications to support the different hardware configuration, and no changes on the Doom and Retro-Go code. Retro-go requires at least an ESP32 with 4 MB PSRAM (Arduino Nano ESP32 is based on NORA-W106-10B, which has 8 MB PSRAM). Kumar claims a frame rate of 34 fps at 320×240, but, judging from the released video, it looks like it is much lower. This is confirmed, by considering the SPI configuration: 34 fps are simply not physically achievable, as the clock frequency is set to 40 MHz, which yields to a maximum frame rate value of 32.6 fps, because the display requires 16 bits-per-pixel data (40 MHz/ (320 x 240 x 16)).
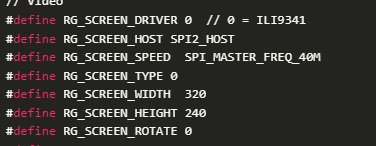
Display settings on Naveen Kumar’s project, showing 40 MHz clock frequency.
Noticeably, the Retro-Go engine could allow for partial screen update, but this is not used in the Doom port. In fact the I_FinishUpdate() function, which is called by when the buffer is ready to be sent to the screen, is implemented as follows:

In particular, the rg_display_queue_update() call has a NULL pointer as second parameters, so full screen update is performed. Beside this, even if this feature was used, typically, turning or moving in Doom will have the majority of the screen to be changed, and the partial-update algorithm in Retro-Go will fall back to full update if more than 50% of the pixels have changed. Also, from a quick look at the screen-update code, it seems that no double buffering is used, therefore the 32.6 fps can be achieved only when the rendering takes 0 ms, because the I_FinishUpdate() will return only after the whole image has been sent to the display, i.e. after about 30.7 ms (i.e. you can achieve 32.6 fps directly facing a wall).
Also, by downloading and analyzing the video (which is taken at 30 fps), we find that when the player moves or turns, there are many cases when the image on the screen in one frame is exactly the same as the previous one, meaning that 30fps is not reached. If it had run at 35 fps, then the screen would have been always different on each frame, when moving or turning.
It’s unclear if multiplayer is implemented.
Summary
We can summarize everything in the table below:
| Port | GBA Doomhack | Our previous project | Kilograham | Arduino Nano ESP32 | This project |
| CPU | 16.8 MHz ARM 7 | 64 MHz Cortex M4 | 270 MHz dual core Cortex M0+ | ESP32-S3 (dual core 240 MHz) | 80 MHz Cortex M33 |
| RAM | 384kB | 256 kB | 266 kB | 512kB embedded + 8 MB PSRAM QSPI (4 MB used) | 256 kB |
| FLASH | Up to 32 MB, memory mapped | 1 M Internal, memory mapped, 16MB QSPI @32 MHz | 2-8 MB QSPI @135 MHz, memory mapped | 16 MB QSPI @ | 1.5 MB internal flash, memory mapped. 8 + 8 MB, interleaved SPI (2 SPI), at 40 MHz, not memory mapped. |
| Screen Resolution | 120 x 160 (240 x 160 in low detail), later updated to 240 x 160 high detail | 240 x 240 | 320 x 200 | 320 x 240 | 320 x 240 (can use 320×200 for higher speed) |
| Game engine | Full | Full | Full | Full | Full |
| Graphics engine | Mipmap on composite textures | Full | Full (modified rendering) | Full | Full |
| Sound | 11025 Hz | 11025 Hz | 49kHz Stereo (upsampled) | ? | 11025 Hz, stereo |
| Music | Yes, modtracker | No | 49kHz cycle-exact OPL2 | ? | 11025 Hz, OPL2 |
| Demo Support | No | Partial (later) | Full for original Wads | Full | Partial for original WADs |
| Cheats | yes | yes | yes | ? | Yes |
| Multiplayer | No | no | Yes, Wired I2C | ? | Yes, Bluetooth |
| Save Games | Yes | Yes (level) | Yes | ? | Yes (level) |
| Frame Rate | 16-35 typical. | 30-34.5 typical measured values | 30-35 typical declared values. | Maximum theoretical < 32.6. (Claimed 35) | >27 fps. Typical values in single player: 31.5 @ 320×240. 35 @ 320 x 200 |
Comparison to a real PC
Unfortunately, because either no data is provided, or the port does not support demo, it is very hard to do a fair comparison.
Luckily, in https://www.complang.tuwien.ac.at/misc/Doombench.html, there is a criteria for submitting benchmarks of Doom running to a PC: using shareware wad, demo 3, “timedemo” mode (i.e. the recorded demo is played as fast as the system can render, ignoring the 35 fps frame rate cap), with the default screen size (i.e. where there is a single layer of border around the screen, corresponding to 288×144 pixels).
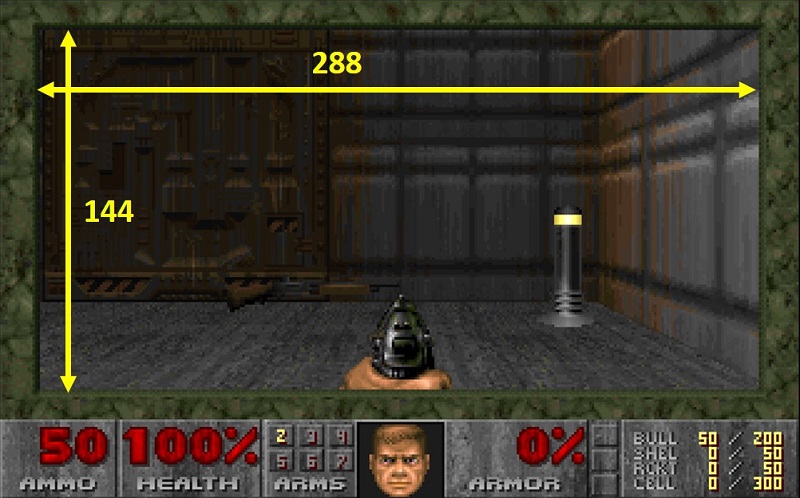
Unfortunately, in our port we cannot set the screen size (one can only choose 320×200 or 320×240 at compile time), so we don’t have an exact comparison. Furthermore, when the scene is very simple, our system has an hardware limit, which clips the frame rate to only 32.6 fps (in 320×240 mode) and 39 fps (in 320×200 pixels mode).
By launching timedemo3, we get:
– 30.9 fps at 320×240 (160% of 3D pixels as the default 288×144 view size)
– 35.9 fps at 320×200 (129% of 3D pixels as the default 288×144 view size)
If we neglect the difference in number of 3D pixels (our being much larger), then we run as fast as an AMD486 at 80 MHz, and faster than some Pentium-class configurations.
By considering the enormous difference in terms of pixel (i.e. by multiplying our frame rate by 1.29 and 1.6), assuming that the speed run only depends on the 3D rendering, then our expected frame rate would be between 46 and 49.4 fps (note: this shows that there is no a linear dependency between number of pixels and actual speed). This means that we are on a par with a 120 MHz 486.
This is not very surprising, as a Cortex M33 has better performance (at the same frequency) than an old 80486.
Limitations
As explained before, the frame rate is limited by the SPI frequency, so one cannot expect more than 32 fps during gameplay, at 320×240. The limit is 35 fps (maximum Doom hardcoded frame rate) if running at 320 x 200, even though in this case the SPI can allow for 39 fps.
Audio output is limited to 11025 Hz. In classic Doom, without networking, there is no sound effect with a sample rate different from 11025 Hz. During deathmatch, however, there is the item-respawn sound effect, which should be played at 22050 sps. In this port, the mixer will just skip one sample out of two.
Multiplayer game also might require a quite clean RF environment. In a normal environment, where you have few devices, this is not an issue. However, if many BLE devices are in the vicinity, you might experience connection issues and instability.
Credits
This port is based on our previous ones, which, in turn, are heavily modified versions of the great work of Doomhack, who achieved the goal of making it run at a playable speed on a device with an ARM7 at 17 MHz, with only 384 kB RAM. The game was more enjoyable and adherent to original features than the official port.
One optimization idea was taken by Kilograham extraordinary port to RP2040, where he removed the 32-bit validcount field in some structures, and used an array of bitfield, instead.
Conclusions
To our knowledge, this is the first port that features BLE-multiplayer, on a single core, while implementing the full graphics engine and game-logic.
The ports only requires 256kB RAM, despite running at a bigger resolution (320×240), featuring multiplayer over BLE and having all the graphics/game-logic features. Music and sound effects are present, albeit only at 11025 Hz. Save games are also limited to level and weapon/ammo/items (no exact state is saved, so loading will bring back at level start location).
Beside the bigger resolution, with respect to the original Doom some minor improvements were added as well:
- Networking with possibility of hosting or joining games with dedicated networking setup menu, including player name.
- The weapon brightness depends on the sector illumination, as in PrBoom.
- Background is darker when menu is on (to improve contrast)
- Kill messages in multiplayer mode.
There are still open tasks, which might be addressed in the future:
- Improving speed even more. For instance, we could implement partial screen update, because the status bar content does not change each frame, usually. This would bring a frame rate much closer to 35 fps even at 320×240.
- Reducing RAM usage even more
- Improving speed and stability of multiplayer.
- Adding battery percentage readout using the built-in I2C battery gauge on the Sparkfun board.
- Adding some progress bar when changing level.