
The first steps…
Instead of discussing and explaining a lot of functions, our opinion is that starting with a step-by-step example is the best way to get into uSVC programming. In the last news, we provided you with a template project, which already has the kernel library and essential files, as well as the compiler settings and linker script. In this way, you don’t have to do all the tedious settings, each time, from scratch. The experienced developers are also encouraged to analyze the project to already understand how it works (beginners: we will explain it later!), and the different debug and release settings, with particular emphasis on the linker script.
However, before we start coding, we need to setup everything, and in particular our main development tool for uSVC: Atmel Studio 7.
Installing uChip Drivers
If you use Windows 10, no drivers are required.
Otherwise:
- Download the latest uChip package from here https://github.com/ITACAInnovation/uChip
- Unzip the file somewhere.
- In the drivers/ subfolder find and execute uchip_driver_installer.exe
Please note, that some antivirus might recognize uchip_driver_installer.exe as a virus, due to their too much sensitive heuristic configuration. This is of course a false positive!
Setting up Atmel Studio
After you download and install Atmel Studio from Microchip’s website, you should download and install BOSSA 1.91 or later from here: https://github.com/shumatech/BOSSA/releases (e.g. https://github.com/shumatech/BOSSA/releases/download/1.9.1/bossa-x86-1.9.1.msi). After installation, you should integrate it for uSVC programming. Here is how to do it:
- Find the directory of where “Bossac.exe” has been installed. If you have installed the x86 version (32-bit version), then bossac.exe should be (by default) in “C:\Program Files (x86)\BOSSA\bossac.exe”. Instead if the x64 version (64-bit version) has been installed, then BOSSAc will be in “C:\Program Files\BOSSA\bossac.exe”. Note this directory down.
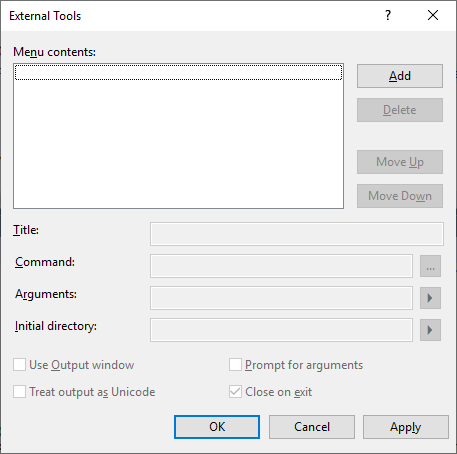
- Open Atmel Studio, go to menu “Tools” and select “External Tools”. A window like that one below should appear:
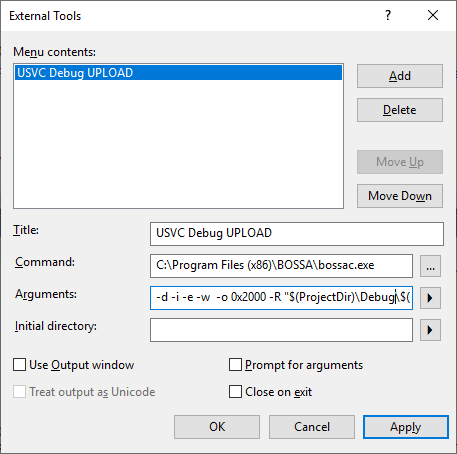
- Click on Add. On “Title” choose something meaningful. For instance “uSVC Debug Upload”.
- On Command, put the directory on which you found bossac.exe. In our case “C:\Program Files (x86)\BOSSA\bossac.exe”.
- On Arguments, put:
-d -i -e -w -o 0x2000 -R "$(ProjectDir)\Debug\$(TargetName).bin"
Warning! It is extremely important to specify –o 0x2000, otherwise you might corrupt the bootloader!
The window should now look like this one:
- Finally, press “OK”.
A new entry, named “USVC Debug UPLOAD” should appear on the menu “Tools”. This entry will be used to test the games. What about creating game packages to be put in the SD? Well, this is for another tutorial!
Uploading games in debug mode to uSVC
Throughout the next tutorials, we will ask you several times to “upload the game to uSVC in debug mode”. Here is how to do this.
In uSVC, games are typically loaded from the SD card. This would require you to create a game package (as we will discuss in a future tutorial) and put them in the SD, which is a rather long sequence of operations.
However, if you are just programming your own game, a much faster way to test your code is to upload directly the game to uChip. Warning: this will overwrite the uSVC game loader! You can restore it later by opening the uSVC_Game_Loader project and using the same upload procedure.
To upload the game in debug mode:
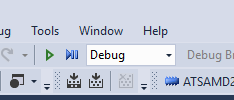
- Make sure you are using the debug mode configuration. To make sure that the active configuration is “debug” you should see “Debug” like the figure below.
Instead, if in the same position you see “Release”, click on the little black arrow on the right, and select “Debug” (you can also set this by going to the “Configuration Manager” in the “Build” menu, and select “Debug” under “Active solution configuration”).
- Build the project by pressing F7, and make sure that there are no errors.
- connect uChip to a USB port of your PC.
- double tap on the reset button of uChip (so that it will enter its bootloader). After that, the built-in uChip LED should blink with a pulsating pattern.
- Select Tools and then “USVC Debug UPLOAD” (or the entry name you previously created in “Setting up Atmel Studio”). After some while your project is uploaded!
Setting up a project
Before actually doing anything, you must create an Atmel Studio Project. We created an empty template project, which includes the uSVC kernel library, the uSVC configuration header, and the settings to run directly your game on uSVC (when you upload the game using the external tool you have configured in the previous step), or through the game loader.
To use the project, you must create an Atmel Studio Solution, and add the project to that solution. You can rename the name later in Atmel Studio. To create an Atmel Studio Solution:
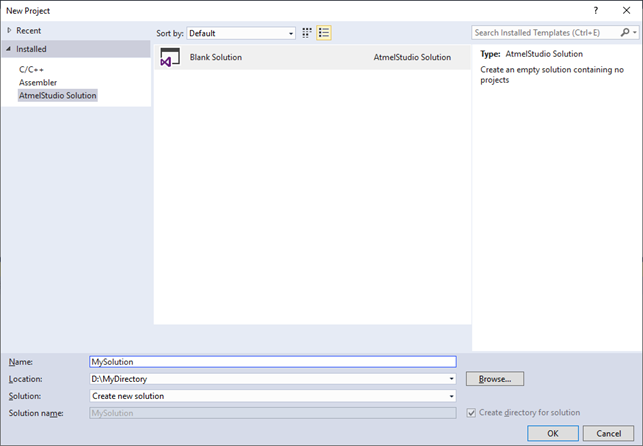
- From menu “File” choose New -> Project, and from there select “AtmelStudio Solution” on the left, and on the right, make sure that “Blank Solution” has been chosen.
- Under Name, we wrote “MySolution”. Of course, you can choose the name you want.
- Under location, choose where the directory having the same name of the solution (in our case “MySolution”) should be created. For instance we have chosen below “D:\MyDirectory”.
With these settings, the window will appear like this:
- By pressing ok, Atmel Studio will create in “D:\MyDirectory” a new directory, named “MySolution”, and there you will find a file named “MySolution.atsln”.
- Download the uSVC repository from here: https://github.com/next-hack/uSVC/archive/master.zip.
- Extract somewhere the zip archive.
- In the directory where you extracted the archive, go in the “software” folder: you should see a “uSVC_Template_Project” folder.
- Copy the “uSVC_Template_Project” directory where “MySolution.atsln” is located (see point 4). You can safely rename the directory “uSVC_Template_Project” to what you want, e.g. “MyFirstTutorial”. In the new directory, you’ll also find “uSVC_Template_Project.cproj”. This file can be safely renamed inside the Atmel Studio, see next steps.
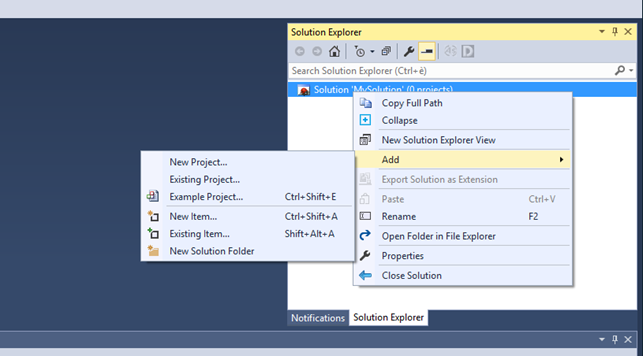
- From the solution explorer on the right, right-click on “Solution: MySolution”, and on the pop-up menu choose “Add->Existing Project…”.
- Navigate through the “uSVC_Template_Project.cproj”, which, if you followed the same configurations, should be in D:\MyDirectory\MySolution\MyFirstTutorial\ uSVC_Template_Project.cproj”.
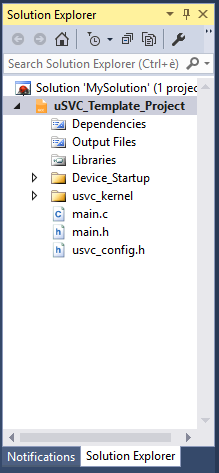
- The solution explorer should now be populated with various items.
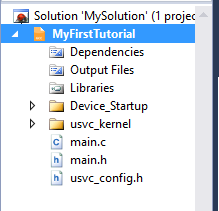
- To safely change the project name, find “uSVC_Template_Project” (under Solution: ‘MySolution’ in the “Solution Explorer” window), right click on it, and click on rename (or press F2). You can now enter a new name, for instance, “MyFirstProject”.
Note! Actually an Atmel Studio Solution is just a container of projects. You can add many projects (which also do not have to reside in the same solution directory!) to a single solution. However, we prefer to keep everything separated, therefore we always create a new solution for each new project. The choice is yours!
Each uSVC project must include the following files:
- The usvc_kernel directory, with all the kernel files.
- The main.c file, where the main function resides.
- The main.h file, where you can include all the file headers you are going to use in your project. This allows you to include just “main.h” instead of having to include multiple headers.
- The kernel configuration file, usvc_config.h
In the following article we will start our first tutorial: drawing tiles!
Hi,
I assume this is the correct place to download Atmel Studio 7?
https://www.microchip.com/en-us/development-tools-tools-and-software/microchip-studio-for-avr-and-sam-devices
yep, you are right! Now it is Microchip Studio 🙂
Thanks.
Another question… Would an emulator be possible at all?
It would useful for quick dev/testing and people without the hardware can play it.
Hi, of course is possible, however it would take a lot of effort doing it…
probably a SDL1 mirror of your SDK, would be better?
ie portable, native exe, emscripten etc
It would be better to dev on SDL1 then flashing the dev all the time?