

Introduction
Even if you can create a game without sound, adding some effects or music will greatly improve its quality, the feel, and the player engagement. For instance, Chris Hülsbeck’s masterpieces made the Turrican saga what it is on Amiga, something that no one that has played it could ever forget. Sound effects are very important too, for feedback, realism, or gratification.
The sound system of uSVC is composed of two separate parts: the sound engine, which deals with sound effect and music timing and properties (pitch, volume, etc.), and the audio mixer, which takes the four channel audio samples values and volumes and generates a single 10-bit sound signal.
As written in the introductory article, the current kernel of uSVC uses a modified version of the great UzeBOX project sound engine. The modified version lacks the noise generator, but it features four PCM sound channels, instead of just one. Built-in wavetables (i.e. basic sounds like sine-, square-, triangle-, etc. waves) are simply treated as 256-byte PCM sounds. Since uSVC’s audio mixer also has an optional low-pass filter, we added to the sound engine the ability of changing the cut-off frequency each frame, to create some interesting effects.
Another difference with the original sound engine – which is mainly due to the different horizontal video frequency – is that sound is produced at 30kHz, instead of 15.6kHz. However, you can also play PCM sounds having a smaller sample rate (e.g. 10 ksps), to save on flash memory (1 second at 30ksps would occupy 30kB, which is more than 10% of uChip’s flash).
Patches
As we have just mentioned above, adding few seconds of PCM sound will eat up your flash memory. To overcome this, the sound engine uses the so-called sound patches. What are sound patches?
Sound patches are lists of commands that allow to control the evolution over time of the sound parameters, like volume, tremolo, pitch, etc.
Thanks to this, we can achieve very interesting and rather complex effects, even with the most basic sound wave, such as a square or sine wave. Each command specifies a delay that indicates after how many frames, with respect to the previous command, each command will be executed.
Each command in a patch requires few bytes, therefore even complex sounds can be created using very little flash memory.
So, how do we create a patch? And how can we play it in uSVC?
First, let us explain how to define a patch. A patch, as said, it is a list of commands, and these commands are a set of two to four bytes. These are interpreted with or without sign, depending on the command, which will be explained later on this tutorial.
A patch is defined as:
const char patch_name [] =
{
    Delay_1, PC_number_1, <param_1a, <param_1b,>>
    Delay_2, PC_number_2, <param_2a, <param_2b,>>
    …
    Delay_N-1, PC_number_N-1, <param_N-1, <param_N-1,>>
    Delay_N, PATCH_END // this indicates the end of patch: no parameter is needed!
};
The delay parameters indicate how many frames the engine will wait (starting from the last command) before executing the command indicated on the next char. Remember that delays are incremental, i.e. a delay of 0 means that the command will be executed at the same time of the previous one. A delay of 57 means that this command will be executed about one second later with respect the previous one. For instance, if there are two commands with a 57 delay-value, then the total patch duration will be 2 seconds. The value 57 is due to the default uSVC frame rate, which is about 57 Hz.
Do not confuse patch duration, with sound duration: sound duration might be longer, for instance for looping sound, which last forever.
The PC_Number indicates which command should we execute, such as volume change, tremolo change, pitch change, and so on. For a list of commands, refer to the relevant section in this tutorial.
The last, optional, one to two bytes of each patch command form the parameter, e.g. volume value, note, etc. All commands, except the mandatory final PATCH_END (which has no parameters) and the PC_SET_FILTER_VALUE (which has 2 parameters) have exactly one byte parameter.
The “Patches” Array
After we define some patches, we need to put them in the patch array, which contains a list of patches, with some other parameters. In fact, the same patch (read: sound configurations and commands) can be used for different soundwaves. In fact one might want to apply the same tremolo effects to different sounds.
The patch array is defined as:
const  patch_t patches[]  =
{
    {type_0, soundWaveNumber_0, pointerToPatch_0, loopStart_0, loopStop_0},
    {type_1, soundWaveNumber_1, pointerToPatch_1, loopStart_1, loopStop_1},
    …
};
Let’s take a look at all the parameters.
As for now, type_n is a reserved parameter, and should be put as 0, which means regular sound. Future releases might have also support for other sounds effects, i.e. the noise.
soundWaveNumber_n indicates which PCM sound should we use. All PCM sounds (including the default wavetables, if used) must be listed in a particular array, named soundWaveList, which will be described in a separated section below. SoundWaveNumber is simply the index to the desired sound wave, in the soundWaveList array. Note that you might create a patch that actually changes or even totally ignore the sound wave number, while it is playing.
pointerToPatch_n is a pointer to one of the patches previously discussed.
loopStart_n and loopStop_n tell where the loop starts and end in a PCM sound wave. When playing a PCM sound, the engine will start from the first sample (i.e. 0), going up to sample LoopStop-1. After that, the audio mixer does not actually stops playing, but change the pointer back to loopStart[1]. A non-zero loopStart value might be used in two cases:
- In those effect in which there is an initial part, and a loop. For instance, a rocket launch, where there is an initial burst, and then a continuous hissing noise.
- In those sounds where there is no loop at all (e.g. a shot). In this case, loopStart should be loopStop-1 (or larger: the sound engine will make the correct adjustments).
The SoundWave List
Few lines ago, we mentioned the soundWaveNumber parameter. This is used as an index to identify the particular PCM sound we want to play. All the PCM sounds must be referenced in another array, which also contains the sample length and rate, in sample per seconds. In particular, we need an array of soundWaves_t, defined as:
const soundWave_t soundWaveList[] =
{
    {length, pointerToPCMSamples, sps},
    …
};“length” is the length of the buffer pointed by the next parameter
“pointerToPCMSamples” point to the actual audio data.
“sps” indicates the samples per seconds at which the audio data was taken. This is used to achieve the right playback tone, even if the audio was recorded at a sample rate that is not 30kHz.
Let’s Play Some Audio!
We will start of course with the basics, going deeper and deeper within this tutorial series. Unlike the previous tutorials, we start with an empty template project. You can follow the first tutorial if you don’t remember how to safely rename it. The sound engine requires several files and data structure, but do not worry: we will guide you step by step. We also provide the link (see below) to the additional files we will use to produce some sound.
Step 1, PCM Samples
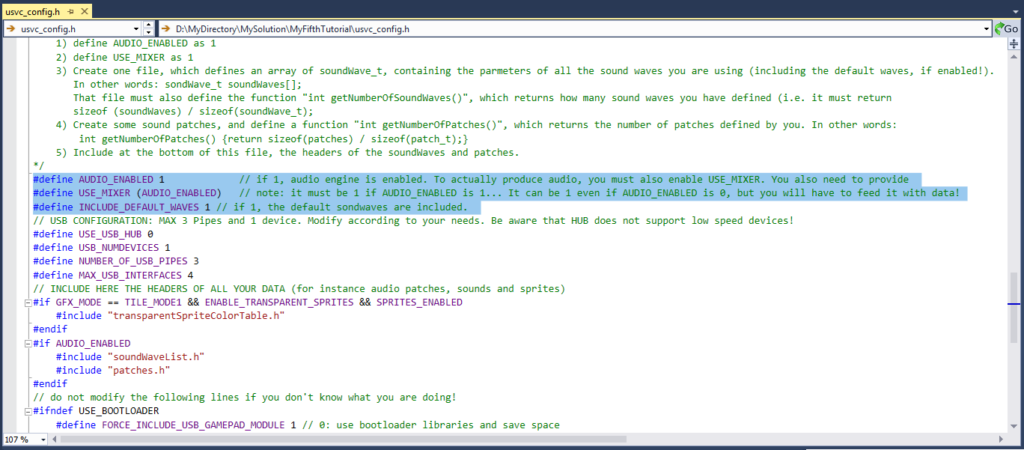
First of all, we need some PCM samples. For now, we use the default sounds. Since your game might not require these default values at all, in usvc_config.h there is the possibility of not including them, to save some flash. In this tutorial, instead, we will indeed use the default waves, so make sure that INCLUDE_DEFAULT_WAVES is defined to 1 in usvc_config.h (in the template project, it is), see figure below.
Step 2, Enable Audio in the uSVConfig.h file
Furthermore, you have to enable audio, by setting to 1 AUDIO_ENABLED, as shown below.
Step 3, Creating the soundWaveList
The INCLUDE_DEFAULT_WAVES switch will include 10 default sounds, the same used in UZEBox. To use them, we must reference in the soundWaveList array. To do this we need to create and include the soundWaveList.c and soundWaveList.h files, and list all of the default soundwaves. To save you the hassle of writing the array, we have provided you with both these files in an archive here.
Step 4, Writing Patches
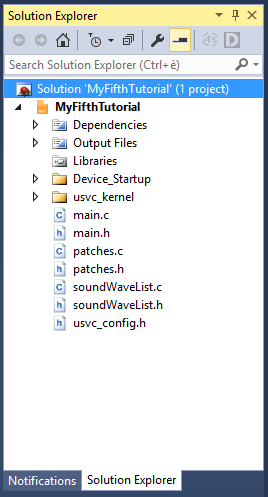
Then, we need to write some patches. The archive you have just downloaded has also the files patches.c and patches.h, so you have already something to play. To include all those files in your project, you can follow the first tutorial. After you have added these files to the project, the solution explorer should be like this:
Note that, unlike what we did for the graphics data files in tutorial 1, you do not have to include patches.h and soundWaveList.h in the main.h file, as usvc_config.h already includes them, if audio is enabled. However, if you include these header files in the main.h, there won’t be any issue.
If you analyze those files, you might recognize that they also define two functions: int getNumberOfSoundWaves() and int getNumberOfPatches(). These two functions are mandatory to use the audio engine, and as their name say, tell to the caller the number of defined soundwaves and patches, respectively.
Step 5, Set the Patch Array in the initUSVC Function Call
Another important thing we need to do, before starting playing with audio, is to change the initialization function call initUsvc() in the main. By default, the parameter is set to NULL, but, if audio is going to be used, the patch list must be provided instead, by writing “initUsvc(patches);” instead of “initUsvc(NULL);” , as shown below.

As a quick check, you might want to compile, there should be zero errors and warning.
Step 6: Call the Sound Engine Every Frame
Patches are handled by the sound engine, which must be called exaclty once per frame. We suggest to call it exacly after the frame has been drawn, i.e. by calling the soundEngine() function right after the waitForVerticalBlank() function call, as shown below.

Remarkably, we called checkForNewFrame(), before actually calling the sound engine. This function must be called because, the function waitForVerticalBlank() actually just waits until the current line number is 401. If you call it, say, when the line number is 480, then it will actually sit there and wait until the current line number becomes 401, and during this time, the whole new frame will have been redrawn. However, if you call it again, without a long enough delay, it will return immediately. In fact, the current line number is incremented each 33 microseconds, a rather long time. In this tutorial we are basically doing very few work in our while(1) loop: in fact, we only call the sound engine and toggle the LED pin, i.e. a pretty low-weight task, and our Cortex M0+ is powerful enough to execute these tasks in a time, which is much shorter than 33 microseconds. Without this check, the soundEngine() would be called more than once per frame, so patch timings would be affected.
Normally, a game would have a much more complex loop, therefore this check is not necessary (and that’s why we did not even use it in the previous tutorials and in our games)! You can also write “while(!checkForNewFrame());” instead of “waitForVerticalBlank();” (and the subsequent check). The result would be the same.
Step 7, Playing a Sound Effect
Now everything is ready: as an example, we will trigger the patch 0 as sound effect exactly before entering the while(1) loop. You might easily change the code so that the sample plays every second (i.e. every time the LED toggles). To produce a sample we need to use the triggerNote() or triggerFx() functions. As their names imply, these API are optimized for notes (it is used for music playback) and sound effects, respectively. Still, you can use triggerNote() also to play sound effects, with some caveats. Let’s have a look at both of them.
void triggerNote (unsigned char channel, int16_t patch, unsigned char note, unsigned char volume)
triggerNote() has the following parameters:
channel: the channel (0 through 3) in which the sound should be outputted.patch: the patch index number (starting from 0) in the patches array in patches.c.note: a number from 0 to 127, that specifies the note, ranging from C-1 to G-11. There are 12 notes per octave. For a complete list, please refer to stepTable.c in the usvc_kernel directory.volume: the note volume from 1 to 255. Note that the actual volume is the product of many contributions, some of which might be modified later by the patch commands themselves. In other words, this command sets the maximum volume. See below the “about volumes” section for more information.
uint8_t triggerFx (int16_t patch, unsigned char volume, uint8_t flags, uint32_t detuning)
triggerFx(), is different, and it is more aimed toward sound effects (even if you can still use triggerNote() for sound effects). In fact, sound effects have a higher priority than the music, so triggerFx() implements a channel stealing algorithm (unless you specify the channel in the flags), that works as follows: channels 1-3 have decreasing priority in tunes, therefore we first try to steal (to the music player) channel 3, then 2, then 1. If none of these three channels are available (because we are playing too many different sound effects at once), we will steal the “oldest one”, i.e. that channel on which the sound effects was started the earliest. Thus, unlike triggerNote(), you do not have to provide (even if you can) with the channel number, which is automatically chosen. Remarkably, channel 0 is never stolen, as it is reserved for the main melody, which we would not like to interrupt.
The function triggerFx() uses the following parameters:
patch: like trigger notevolume: idem.flagsis a bitwise OR of the following values:FX_FLAGS_RETRIG: If the same patch is being played on some channel, it will replay the same effects starting from its initial position. Otherwise, the usual algorithm described above is used.FX_FLAGS_SPECIFY_SAMPLE_FREQUENCY: the sound effect is played at the sample rate specified in the corresponding entry in the soundWaves array. It uses the detuning parameter, described below.FLAGS_SPECIFY_CHANNEL_N(n): this macro allows you to force triggerFx to use the specified channel n.
detuningis 16.16 fixed point value, and specify how faster or slower should the sample played, i.e. changing its pitch. A value of0x10000(i.e. 65536) means that the sound is played at the exact sample rate at which it was recorded. A value of0x8000(i.e. 32768) means that the sound will be played at half the sample rate specified in the soundWaveList. The detuning should no larger than32 * 0x10000. This means that at most a sample can be played 5 octaves up. Beware that the 4 least significant bits are discarded.
That said, add the following line before the while(1), as show below:
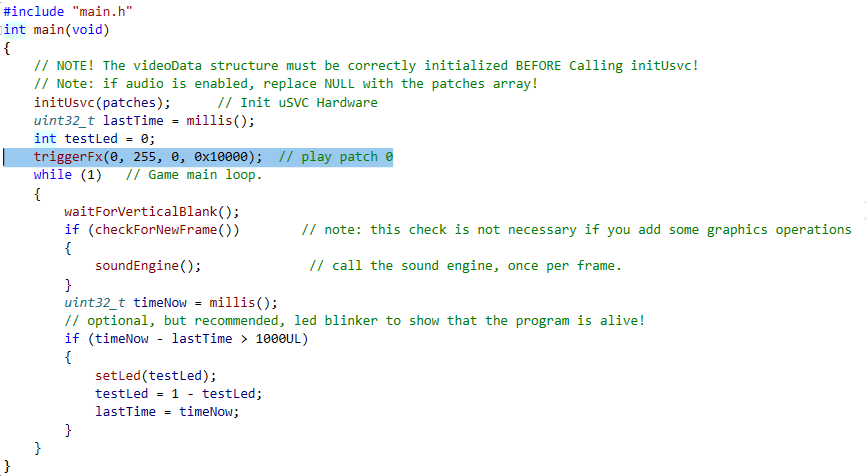
If you connect an amplified speaker, and program uSVC in debug mode, you should hear, after reset, the sound corresponding to patch 0: a simple 1-second beep at 440 Hz, using a sine wave.
Let us analyze what actually the patch 0 does. The patch 0 is defined as:
const char myFirstPatch[] =
{
    0, PC_WAVE, 0,       // set sine wave
    0, PC_PITCH, 69,     // set note 69, 440 Hz
    57, PC_NOTE_CUT, 0,  // stop playing after 57 frames
    0, PATCH_END,        // mandatory end of patch
};
The first two commands are executed in the same frame: we set the wave and the note. The third and the fourth commands are executed after 1 second: the volume is cut and we signal also the end of patch.
The note and the wavenumber can be overridden by the patch command. For instance, instead of playing patch 0, let’s play patch 1, by changing the first parameter of triggerFx();
You should hear two notes, with also different timbres, one second each. The second patch is defined as follows:
const char mySecondPatch[] =
{
    0, PC_WAVE, 3, // set square wave, 25% duty cycle
    0, PC_PITCH, 69, // set note 69, 440 Hz
    57, PC_WAVE, 1, // after 1 second change wave to sawtooth
    0, PC_PITCH, 71, // set note to 71, 493.9 Hz
    57, PC_NOTE_CUT, 0, // stop playing after 57 frames
    0, PATCH_END, // mandatory end of patch
};
Before we conclude this tutorial, we want to explain other two aspects: the volume and all the patch commands.
Volumes
In the sound engine there are many volume parameters:
- The track (i.e. channel) volume, set by the midi music. The default volume is
255, so if no music is played, it stays at255forever. - The note volume, which is set by the
triggerFx()ortriggerNote()volume parameter. - The envelope volume, which can be changed by the respective patch commands.
- The tremolo level, which is a value, between
0and255. The larger the value, the higher the effect (up to 100%) on the volume. - The master volume (which is applied to all channels).
All these volume levels are multiplied and normalized to their maximum value (255). The only exception is the tremolo level, which is explained in the section below, when we deal with tremolo patch commands.
Patch Commands
As a last part for this first tutorial on sound, let’s explain all the patches commands. You are encouraged to create your effects, using any combinations!
PC_ENV_SPEED: set the envelope volume variation (in terms of increments per frame) of the channel in which the current patch is being played.
Params: 1 signed int8_t, determines how much louder (positive values) or quieter (negative values) the sound will become each frame. A value of zero means that the volume is constant.
PC_WAVE: select the wave that should be played.
Params: 1 byte, from 0 to 127.
PC_NOTE_UP: increments by a number expressed in 1/12 of octave (i.e. half note) the current note.
Params: 1 byte, numer of half notes.
PC_NOTE_DOWN: same as note up, except the note is decremented.
PC_NOTE_CUT: Stops the playing of current note, by setting the envelope volume and speed to 0.
Params: 1 byte, ignored
PC_NOTE_HOLD: Wait for note off on the midi music.
Params: 1 byte, ignored
PC_PITCH: sets the current note, from 0 to 127, see stepTable.c
PC_ENV_VOL: sets the current envelope volume. Note that this does not reset the envelope volume change parameter, therefore if the volume was sliding up or down, it will continue sliding up or down.
Params: 1 byte, note.
PC_TREMOLO_LEVEL: tremolo is achieved using the sound wave 0 (which must be 256 bytes long) as modulating signal of the current channel volume. The amount of modulation is determined by the tremolo level value, where 0 means no modulation (i.e. the volume is not affected), and 255 means a 100% modulation.
Params: 1 byte, modulation depth (255 = max, 0 = no modulation)
PC_TREMOLO_RATE: Sound wave 0 is used as the modulating signal of the current channel volume. On each frame, the index of the soundWave0 is incremented of the value specified in this command. Since a full period is 256 samples long, if you set the tremolo rate at 1, a full modulation will occur in about 4.5 s (because the frame rate is 57Hz). If you set the tremolo rate to 9, the modulating frequency will be 2 Hz.
Params: 1 byte, how fast the modulation will be. In particular, how many sample we should skip on the modulating signal each frame ( 1 = no skipped samples, 2 = 1 skipped sample, and so on).
PC_SLIDE: Slide command allows to gradually change (linearly) from one note to another. This command must be entered after PC_SLIDE_SPEED.
Params: int8_t deltaNote. Number of half notes up or down at which we want to go to at the end of the slide operation.
PC_SLIDE_SPEED: Determines how many frames should last the slide effect.
Params: uint8_t numFrames. (57 = 1 s)
PC_LOOP_START: allows the generation of loops. The commands between PC_LOOP_START and PC_LOOP_END will be repeated the specified number of times.
NOTE! No 2-byte parameter commands (i.e. PC_SET_FILTER_VALUE ) are allowed in loops!
Params: uint8_t number of repeats
PC_LOOP_END: identifies the end of the loop.
NOTE! No 2-byte parameter commands (i.e. PC_SET_FILTER_VALUE ) are allowed in loops!
Params: uint8_t number of instructions to go backward (0 = the engine will automatically detect the first PC_LOOP_START, and will jump there). Note: since the number of bytes to go backward is hardcoded to 3 per instruction, PC_SET_FILTER_VALUE command is not supported in loops.
PC_SAMPLE_RATE_NORMALIZE: adjust the increment so that the sample will play exactly the specified note.
Wavetables are 256-sample long, i.e the period is 256 samples. The step values in stepTable.c are calculated considering the 30 kHz sample rate and the 256-sample period. However, if you want a more complex sound sample, you might need a wave longer than 256 bytes. For instance, if you use a 512-byte sample, the values in stepTables.c should multiplied by 2, otherwise you will get a sound that is one octave up the desired note. This command will modify the increment value based on the sample length and selected note.
Params: 1 byte, reserved to 0.
PC_SAMPLE_RATE_SPECIFY: adjust the increment so that the sample will play nominally at the sample rate specified in the soundWaveList array.
Params: 1 byte, reserved to 0
PC_SET_FILTER_VALUE: changes (if enabled) the audio filtering coefficient.
Params: 2 bytes (little endian format) that generate the filter coefficient.
PATCH_END: mandatory in each patch, indicates the end of the patch command list.
Params: none
To be continued
This concludes the first part of the tutorial about sounds. In the next tutorial we will deal with custom PCM sounds, and the triggerFx() vs triggerNote() APIs. Finally, we will deal with the MIDI music playback!
[1] The actual implementation is a bit different to support different play rates, but here we are just explaining the working principle.