
Introduction
Last time we started our journey about producing sounds on uSVC. We hope that you played in the meantime with the various patch commands! If you are curious about some effects you might achieve, you can download the source code of uSVC Tetris, and check the patches.c file.
In the previous part, we just used patches and default sounds. Despite them being very flexible, sometimes you might need a PCM audio sample: a shot, an explosion, a speech, etc. Thankfully, uChip supports PCM audio samples, which allows for more realistic sounds. The issue here is balancing the audio quality, with flash usage. Yes, high sample rates get more natural and pleasing sounds, but will literally eat up all the available flash memory, leaving very few space for graphics, game data (maps, initial sprite positons, etc.), and code.
uSVC has support for 8-bit audio samples only, so you cannot trade resolution with flash usage, so you can only reduce length or sample rate. In some cases, reducing length is not possible, so you can only reduce the flash usage by acting on the sample rate. uSVC supports arbitrary sample rate, so in this sense you have a lot of flexibility.
Note that each PCM sound can have its own sample rate. This is very useful, as some sounds effect are still good even at lower sample rates, while other require higher value. This allows for a better optimization of the memory usage. You should check on a case-by-case basis the minimum acceptable sample rate for each sound you want to play.
Optimizing the sample
The first optimization step is to remove any silence part at the beginning or at the end of the sample. Note that at 30ksps, even a 0.1-s silence corresponds to 3kB of wasted data! Note also, that for silence we do not necessarily mean 0-valued samples, but also those parts that have a very low volume, which are unlikely to be appreciated by the player during game, when other effects or music are played.
If silence occurs in the middle of the sample (e.g. when you have a speech made by two words), consider instead of having two separate samples. For instance if you have a car-game, and you want a voice saying: “ready, set, go!”, it would be a lot better if you had 3 distinct sounds, one for each word.
To trim (remove silence) and cut audio samples, we suggest Audacity.
Sometimes you’ll find some sound effects which are too low in volume. It is always better to get full-volume sounds, and let the uSVC sound engine to eventually reduce the volume, if in your game you need a quieter one. Therefore, you’ll need to normalize the audio sample to the maximum undistorted volume. This will allow to achieve an audio sample that has at least an 8-bit resolution (better resolution is not needed as uSVC sound engine works with 8-bit samples). This is almost always true, because you’ll almost always start with 16-bit wave files.
Another optimization is using patches. Say you have one sample, that needs to be repeated (at different volumes – e.g. to simulate echo – or at different pitches), instead of using the repeated sound, you could use a single sound, and repeat it through patch commands. Or if you have a rocket, or a bomb sound, that for instance, changes pitch during time, instead of saving the whole sound duration, one could save just a small fraction, have it looping, and change the effect pitch during playback with time using patch commands.
The last optimization is of course a tradeoff between quality and space. The higher the quality, the higher the memory taken by the sound effect. However, the full 30ksps capability is not always required for an acceptable quality, and we suggest using Audacity, to get a first preview about the quality of your sample at different sample rates. Keep in mind, that the final quality will be lower, as Audacity at minimum use 16-bit samples, whereas uSVC features 8-bit audio.
However, nothing can optimize like a series of patch commands. With experience, you might realize that several effects can be reproduced with a good fidelity using only the default sounds and a series of patch commands, without requiring PCM samples.
Optimization Example
For this tutorial, we will use a wav file you can find on opengameart.com. We will modify it to remove unnecessary parts, reduce the sample rate and finally add some patch commands customize it.
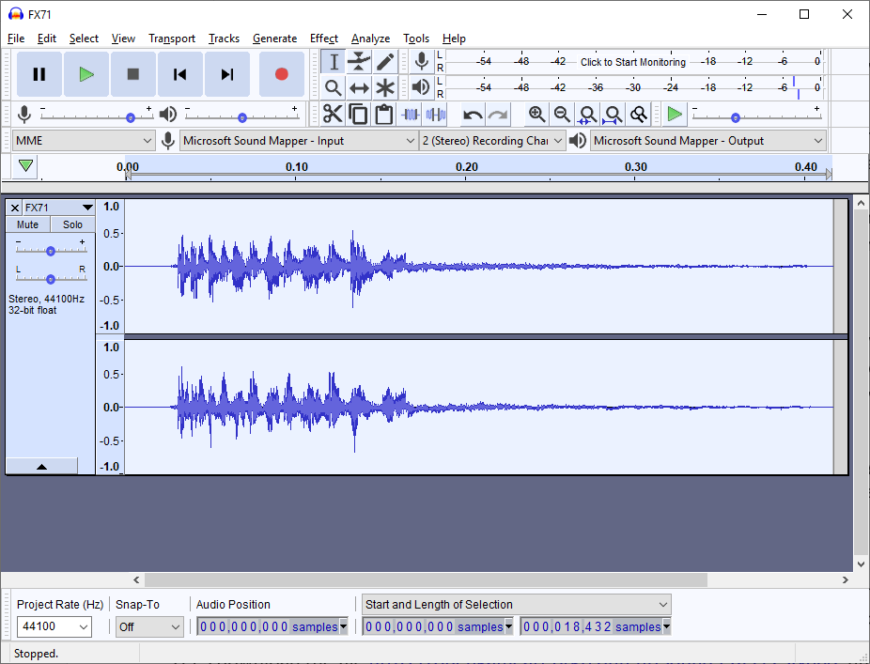
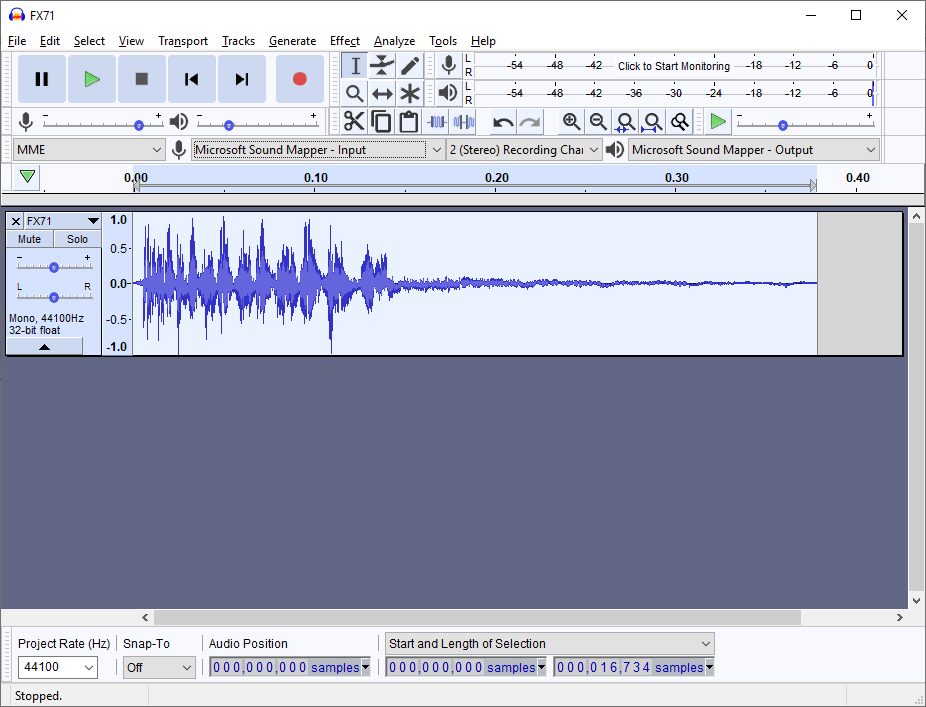
Let’s download the file https://opengameart.org/content/sound-effects-sfx008, unzip it, and open the file FX71.mp3 in Audacity. You should get something like what is shown below.

As you might see, this audio is all but optimized: it has a silence part at the beginning, and its volume is quite low.
First let’s mix the audio to mono (using “tracks->mix->mix stereo down to mono” menu). You should now get a mono audio sample.
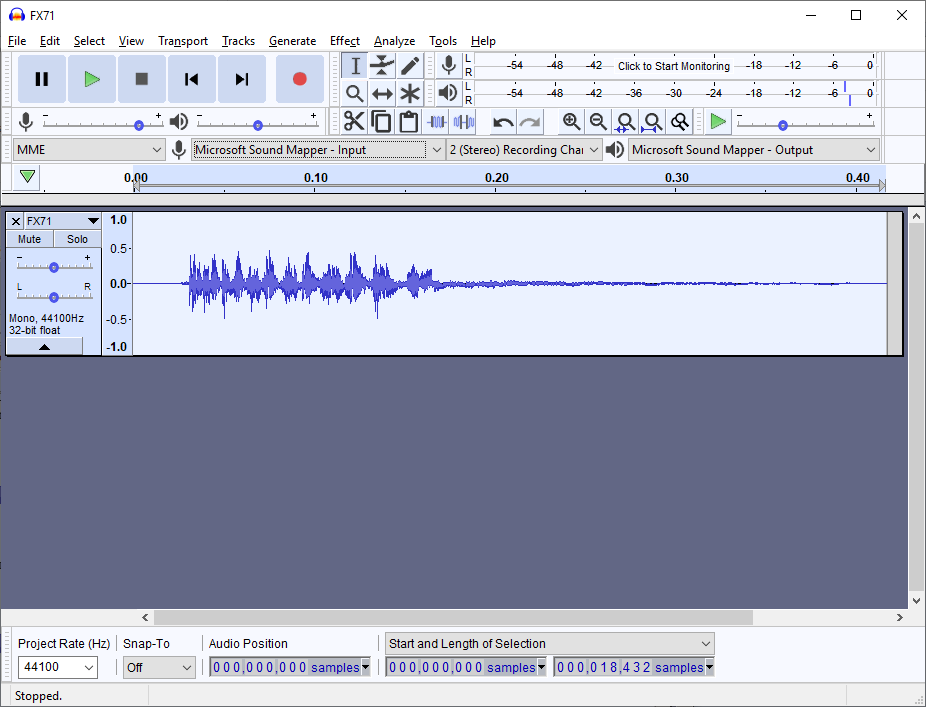
Then, let’s normalize the audio, so it is at its full volume.
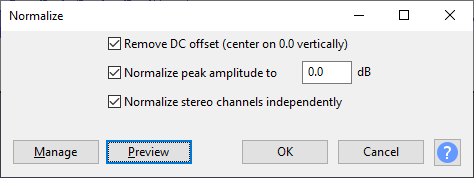
So, select from the Effect volume, the “Normalize”. The following window will appear:
Press ok. The audio will appear now as fully amplified:

Then, let’s remove the silence. You can do it by hand, or you can use the Truncate Silence from the Effect menu. The following window will appear:
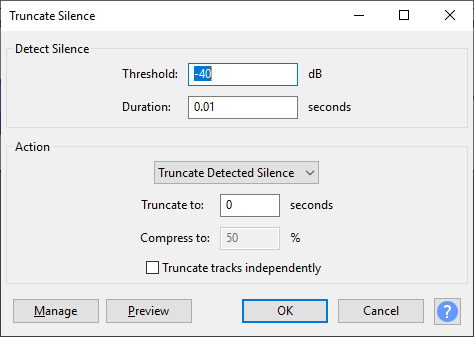
We set the duration to 0.01 and threshold to -40dB. These values vary on case-by-case basis.
If you press ok, you get something like:
As you can see, the number of samples has been reduced.
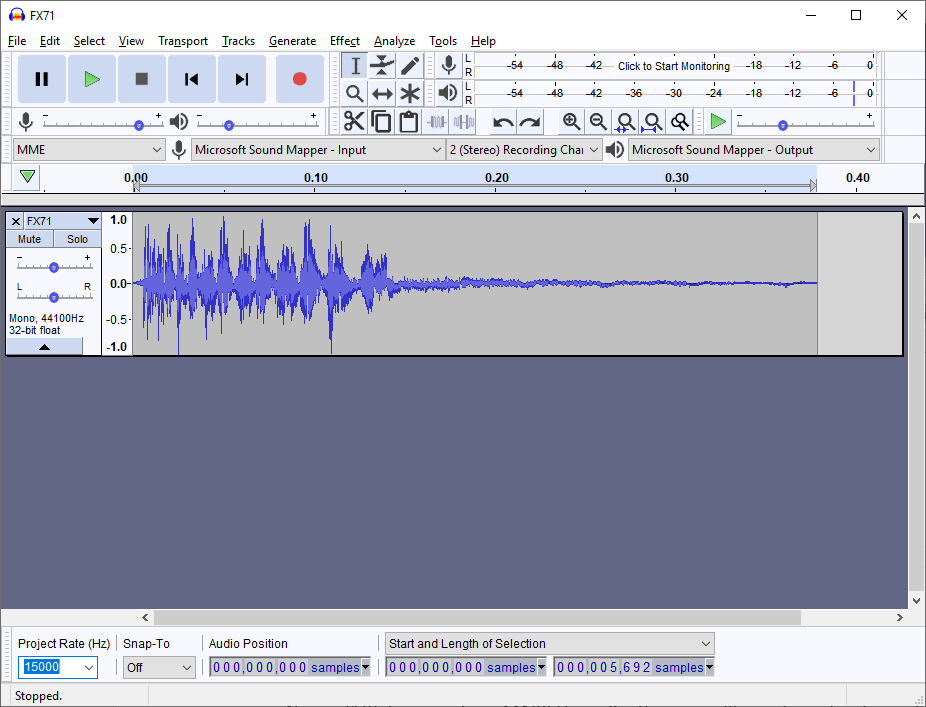
Now, uSVC does produce 44100 Hz audio. You can still use them, but it would be a waste of memory, because the sound engine would skip some samples. Better to already reduce the sample rate.
If you set 30000 on the project rate you would still use about 11000 samples (11kB). In our case we reduce the project rate to 15000 Hz, so that we get about 6000 samples (6kB).
Now export to a wav file (Menu File->Export->Export as Wav), and save it as a 16 bit signed wav.
Exporting the Audio to a C File
It is time to open the uChip Game Map Editor and convert the file to a C header.
To convert the file, select from the “Utilities” menu, “Export Wav To C”. Open the wav you just created, and a window asking for the variable name will appear:

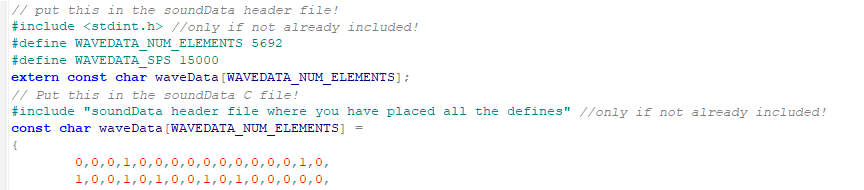
In the example we leave waveData, however in your game you should make sure you get a unique variable for each sound effect. Once you press ok, the editor will ask where you want to save the exported file. After you confirm, you’ll get the confirmation about the successful conversion. Let’s open it! The file resembles the structure of exported tiles or sprites. There is a section you should put in a header file, and a section you should put in a C file, as shown below:
Adding the Exported File to the Project
Let’s use (a copy of) the project you made for the last tutorial, and let’s modify it so that it includes the new sample.
In our example games, we always include all the sound effects in a single file. This will create a huge file, but it will help you in reducing the number of files, and, the need to include them all in your project. You can have a single couple of header and c files for each sample, but, unless you put these files in a separate directory, your project structure would be quite a mess.
We have no soundData.c and soundData.h files yet in our project. Let’s create them by right clicking on the project name in the solution explorer, and selecting Add, New Items, C and include File, respectively for soundData.c and soundData.h files.
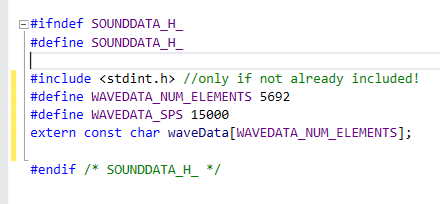
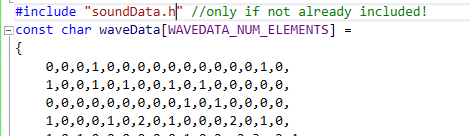
In these files, copy what it is suggested in the image above (like we did for the tiles and sprites) and save them. Furthermore, in main.h, include the file soundData.h, by writing, after the last #include line, the line #include “soundData.h”.
SoundData.h should be like the picture below.
Similarly, soundData.c should be like this:
Playing the Sound Effect
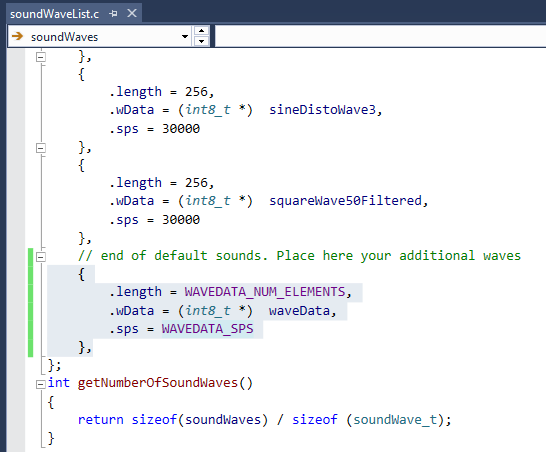
To use the new sound, we need to put its reference, length, and sample per second in the soundWaveList array. To do this, open soundWaveList.c and add a new entry, like we did below.
Now, we need to add an entry to the patch list. If we are going to play the sound as is, i.e. without modifications, then you just simply need to create an entry in the patches array, without actually creating a new patch.
We did this by adding the highlighted region below:

Let’s take a look at the various parameters.
The first parameter is 0 by default. The second points to the eleventh element in the soundWaveList array (DEFAULT_SOUND_NUMBER is 10). The third parameter is NULL. For now we do not use a patch. The other two parameters are the loop start and stop, respectively. The loop stop is set to the number of samples in the sound effect, so that, when the mixer tries to play that sample, it will roll back to the sample number indicated by the “start” value, which is actually the last sample of the sound effect. This has the purpose to play the effect only once (if, for instance, you set 0, the whole effect would play in a loop, forever).
Now, in the previous tutorial, we triggered an FX before the while(1), in particular the effects 0 and 1.
Now we want to trigger a PCM audio, with the exact sample rate frequency, so we need to substitute the line with the following:
triggerFx(2, 255, FX_FLAGS_SPECIFY_SAMPLE_FREQUENCY, 0x10000);
Note that we also added the flag FX_FLAGS_SPECIFY_SAMPLE_FREQUENCY, which remember the sound engine that the PCM sample is using a different sample frequency, specified in the soundWaveList array (15000).
If you compile and upload the example in debug mode, you should hear the sound effects as soon as uChip resets.
Let’s create a patch that will modify the sound, to add something more interesting, like the repetition of the sound, like if it was a burst shot.
For this purpose, we add a patch like below:
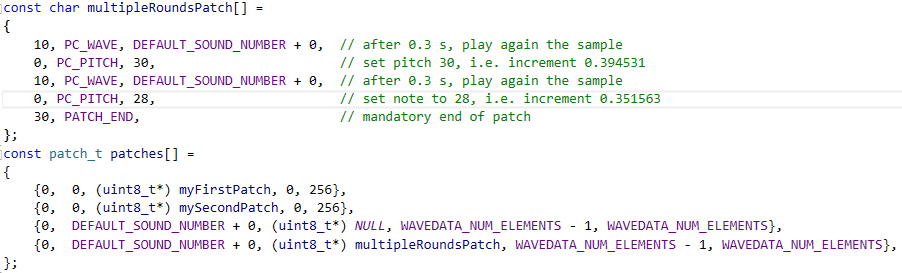
If you change the first parameter of the triggerFx to 3 (i.e. that points to the new effects in the patches array), compile and upload in debug mode, you should hear a multiple shot, 3 rounds. The first one, played at the specified sample rate (it is automatically triggered by triggerFx), and the other two at a lower pitch, triggered by the patch commands PC_WAVE and PC_PITCH.
You might wonder how did we choose the PC_PITCH parameter (30 and 28) in multipleRoundsPatch. The original sound is a 15ksps, and its first instance is played with an increment of 0.5, thanks to the flag FX_FLAGS_SPECIFY_SAMPLE_FREQUENCY. In fact, 30000 Hz (uSVC mixer sample rate) multiplied by 0.5 yields 15000Hz. The increment of the other two depends on the note indicated as a parameter. These corresponds to the specified increment you might find in stepTable.c. In that file we simply chose the note corresponding to an increment of about 0.4 (12000 sps) and 0.35 (10500 sps).
As a last remark, let’s check how much flash we used, and how much we saved.
The total duration of this patch is about 0.7s. If we did this using a single PCM sound effect, we would have used about 10.5kB, instead of less than 6kB, which is what we are using now. The flash occupation would have been even larger if we kept 30ksps and the “silence” section on the original sound file.
Conclusions
This concludes this second tutorial on sound. Now you are able to play arbitrary PCM samples, for more realistic and higher quality samples! In the next tutorial we will finally deal with music!