
Introduction
As we said in the first part of the tutorial dedicated to sound, the music in a game plays often a very big role. And maybe, of our favorite games, the soundtrack is what we remember most.
In this last sound tutorial, we are going to finally play some music! Let’s begin!
MIDI Songs on uSVC
The UZEbox sound engine (from which we derived the uSVC’s sound engine) supports MIDI files. However, to remove unnecessary / unsupported midi commands, and to export to C file, we will use the uChip Game Map Editor, which has an embedded tool for this purpose. We will need also some audio software to create or edit our MIDI tune. For this tutorial, we will use Anvil Studio, you can download here.
Going deep into details about how to create a good MIDI for uSVC is beyond the scope of this tutorial, and other sources are available elsewhere.
That said, first you need to create a midi file. You can start from scratch, or you can download (e.g. from opengameart.org) or convert your favorite tune. Anyway, for a MIDI file to be played on uSVC, it must satisfy these limitations:
- Only 4 tracks. If your original MIDI has more than 4 tracks, you can try and merge them, but you must satisfy the point 2 below.
- For each track, only one note shall be played at once. If there are more than one note playing at once, the result will be not as expected. There are several techniques to see what notes should be dropped. The best one is trial and error!
- The main melody should be put in track 1, so that sound effects will not interrupt it.
- Tracks 2-4 have decreasing priority, so put in the last track, the last important instrument of your tune.
- The patch number that will be played is determined by the instrument number (minus one). In particular, considering the general Midi (https://en.wikipedia.org/wiki/General_MIDI) instruments, if you choose the Acoustic Grand Piano for one track, that track will play the first patch (patch 0) on the patch list. Of course, using the program change event, you can change the patch that is played on that particular track. This is useful to simulate more tracks.
In some cases, your song might have repeated sequences of notes or effects. Each change in the note pitch, or volume or any parameter will correspond to a MIDI event, which will increase the size required by the tune. A trick is to create a patch containing such events, so that, instead of having to repeat N times the same group of event, you need just to trigger one note.
This trick is laborious to achieve, therefore we suggest using it only if you are running out of flash memory on your game.
Importing MIDI Files in uSVC Projects
To start with something, let’s use the Tetris main tune, you can download here.
Also we will use Tetris sound patches you can find in the github repository here: https://github.com/next-hack/uSVC_Tetris
Once your tune is “ready for uSVC” (the Tetris tune is already), you can start the uChip Game Map Editor, and open the conversion tool (Menu Utilities -> Export Midi To C). The following dialog will appear.
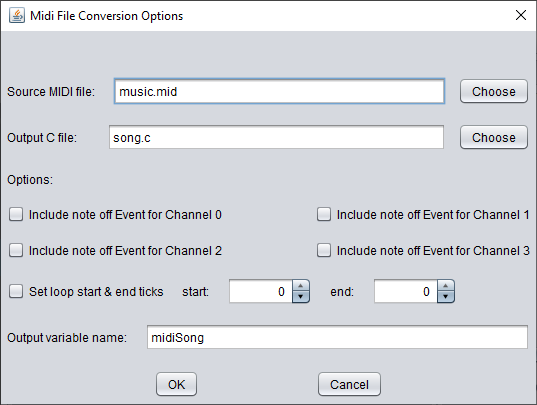
Let’s describe all the fields.
The source Midi File and output C file fields are pretty self-explanatory. We suggest you to use the Choose buttons.
Note off events are usually not required, as you can put them in your patches, however in some case you might have to explicitly include them. We suggest to leave these options not enabled.
Set loop start & end ticks are used to determine the loop of a song. You do not specify them, the song will play only once. If you want the song to be played in a loop, then you need to indicate where it starts and where it ends. When the MIDI engine will reach the end tick, it will go back to the start tick. A non-zero start tick is used if your song has an introduction part, which shall be played only once (like when you have a boss. E.g. like the final bosses on R-type II).
To determine the tick that you shall put, you can use the event viewer on Anvil Studio, and put on the “end” field, the tick shown on the last note off event (alternatively, add the note duration to the note start tick). On Anvil Studio you can see the event list selecting the menu View->Event List.
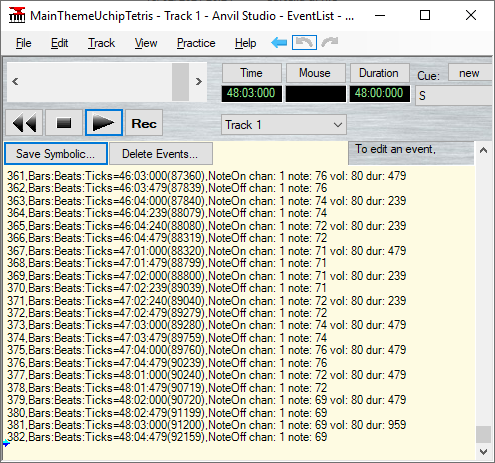
Using the Tetris tune, from the previous image we find that the end field should be 92159.
The output variable name is self-explanatory too: it is the name of the array that will be defined in the C file.
Once you’re done press OK.
The specified file will be created. It will define a const char array with the specified name.
Now let’s use the project we created last time, just to be sure that everything is enabled. From the Tetris source code, we will have to copy the following files:
- patches.c
- patches.h
- soundData.c
- soundData.h
- soundWaveList.c
- soundWaveList.h
Let’s import the song too! To do this you can simply create a new empty C file and copy & paste the content of the file created by the Map Editor, or you can import it, by adding an existing file (press Shift Alt A) in Atmel err Microchip Studio.
Now, assuming you called your array “midiSong”, you must write in main.h: “extern const char midiSong[];” before the last line (#endif).
Finally, to start the song, you can write, before the main loop (while(1)) the line: startSong((uint8_t*)midiSong);
The main() code should be like this one:
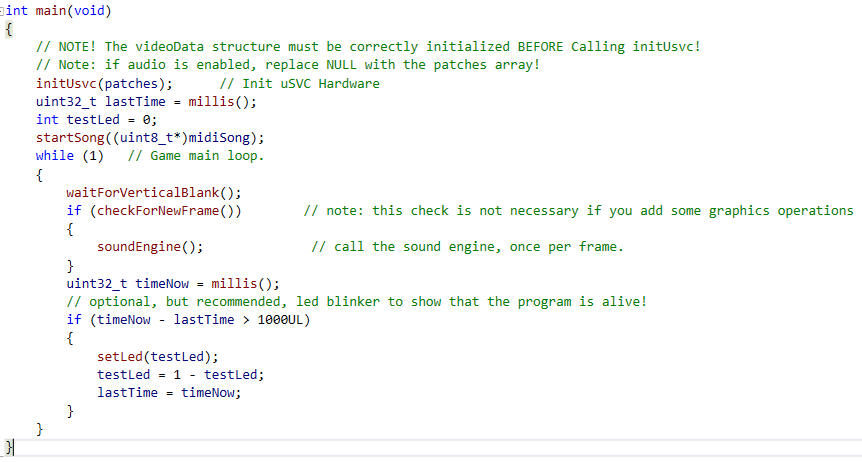
If you compile and upload in debug mode, you will hear the Korobeiniki melody (Tetris tune).
Other functions
To stop the song you can use stopSong(), to resume it resumeSong(), simple, right?
You can also set the song speed – very useful for instance during boss or when the player is losing-winning-, but to do this, you must go to the usvc_config.h file and define SONG_SPEED to 1, like below:

Once SONG_SPEED is set to 1, you can call setSongSpeed(). Positive values will increase the speed, negative values will decrease it. A value of 0 means no change with respect the default speed. Please be sure to use the latest uSVC kernel (download from github) as previous version (pre 2021-02-21) had a bug that prevented setSongSpeed from working correctly.
Let’s try it! Define a variable speed (note that although we defined a 32 bit integer, valid values are only between -128 and 127), and call setSongSpeed() every second as we did below. Please note that every second we are also increasing the variable speed too (note the “++”).
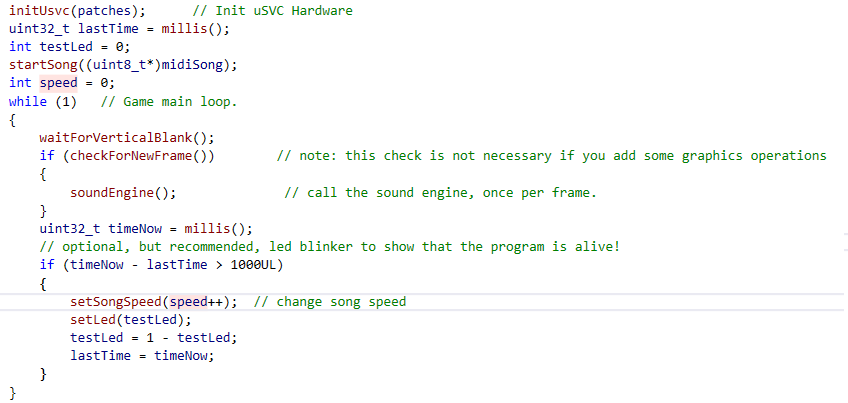
If you compile and upload, you’ll hear the Tetris tune increasing speed each second. Eventually, after about 2 minutes the variable speed will reach the value 128. If you convert this to a signed byte, you get a negative number. This corresponds to the maximum slowdown.
Finally, we encourage you to experiment and play some patches using the triggerFx() and triggerNote() function. Can you hear the difference between the two APIs?
Conclusion
Now you have all the basics to create a full featured videogame with uSVC. The features of uSVC do not end here, and many other things needs to be explained. These will be covered in future tutorials!
Stay tuned!